最近进入了大数据领域,又一个之前没有涉足过的方向,但基本以ElasticSearch为基础,依据ES的读写结合数据采集传输分析提供服务,在技术架构中再掺和中间件,消息,以及微服务相关的注册中心,网关等,就组成了完整的一套大数据采集分析平台;对于一项新技术的研究,我依旧是按照自己的节奏,本地将涉及到的各个开源组件逐一研究一遍,了解下各自的功能和用法,进而串联起来熟悉整个系统
一个一个组件来用,大致流程:
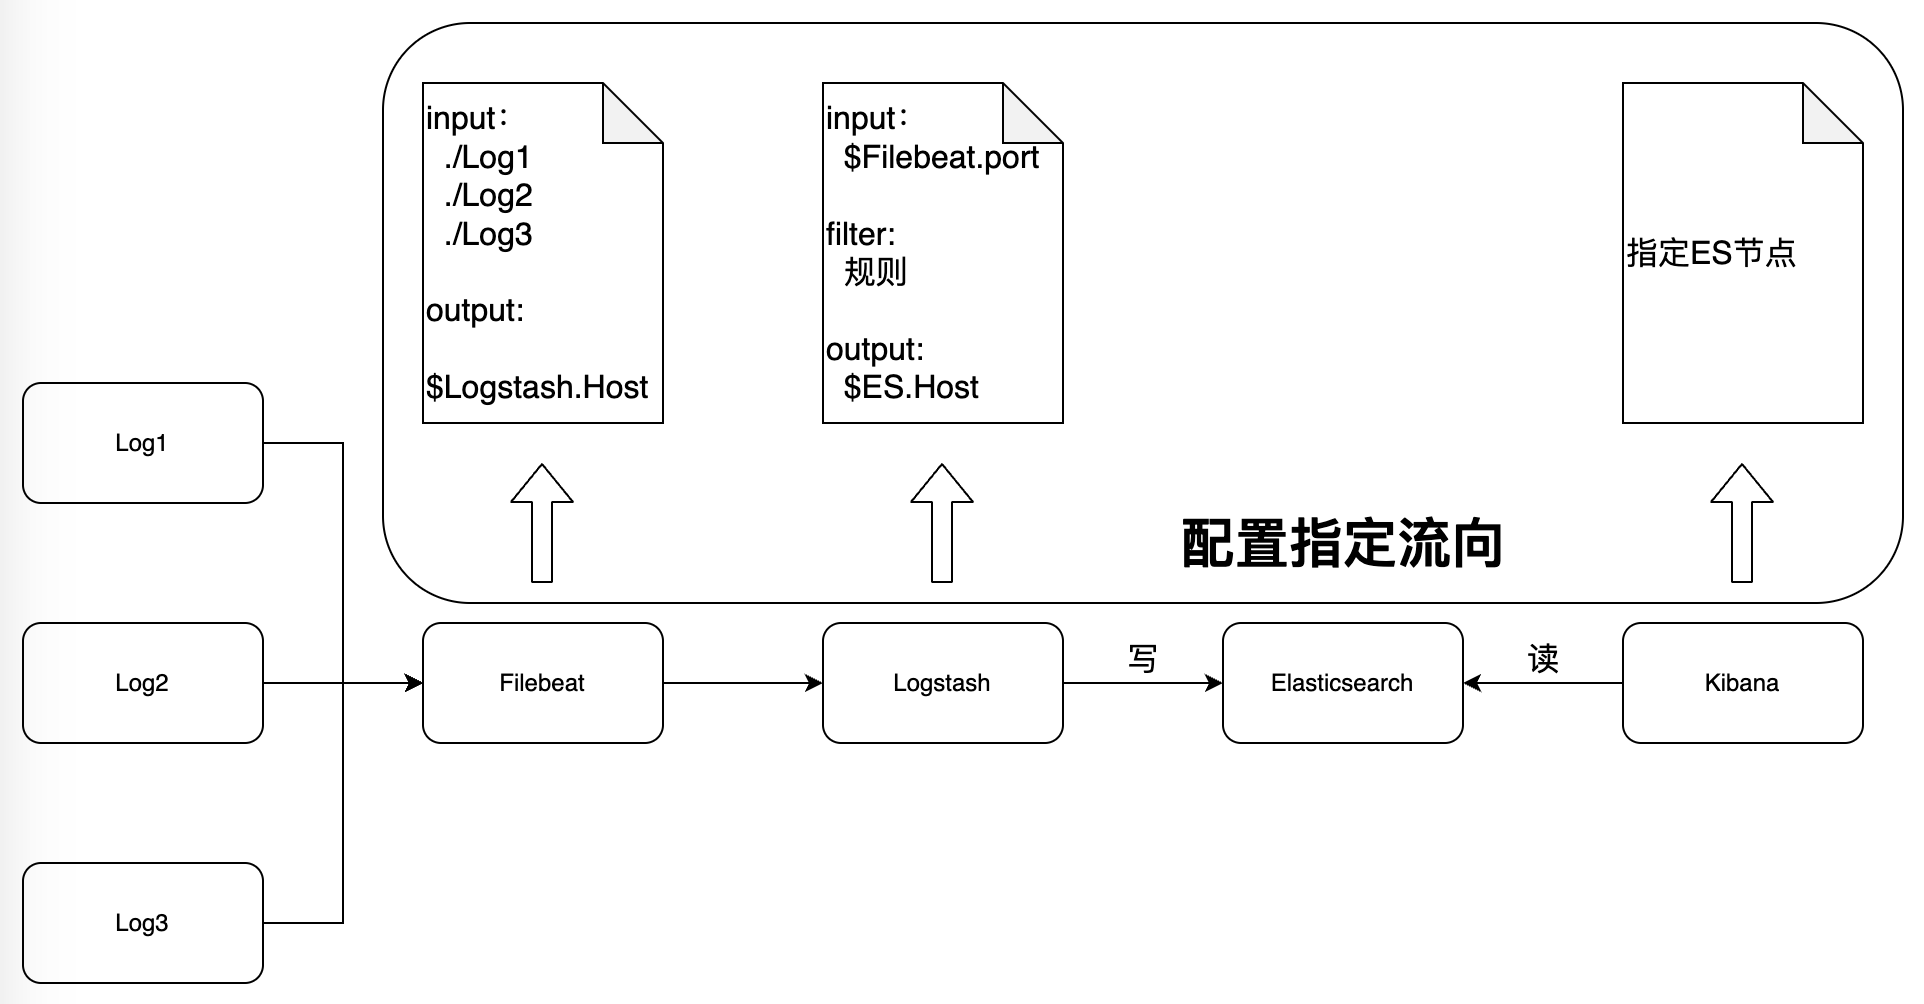
1、首先自然是核心模块ES了,很多公司运维都会维护一套ES,用于日志检索,比如开发会将服务日志接入,假如出现报警,直接通过Kibana页面搜索INFO,WARN,ERROR等相关的日志信息来定位问题,Elasticsearch它本身不仅是一个分布式文档存储,而且还是一个分布式搜索引擎,因此就直接本地部署一个试试用法
下载可以直接官网下,如果是容器化部署可以直接docker拉镜像,我这里下载整个release包,下载链接如下,可以自行选择版本:
https://www.elastic.co/cn/downloads/past-releases#elasticsearch
我这里下载的7.10.0版本,开箱即用,十分方便,因为是java写的,因此可以看下jvm配置文件,config/jvm.options里默认内存1G,根据自己的机器设置
################################################################

# Xms represents the initial size of total heap space
# Xmx represents the maximum size of total heap space

-Xms1g
-Xmx1g
接着就可以直接启动ES:bin/elasticsearch
启动之后,curl以下9200端口,可以看到我启动的es版本是7.10.0
lihui@2023 ~ curl 'http://localhost:9200'
{
"name" : "2023",
"cluster_name" : "elasticsearch",
"cluster_uuid" : "Np25HHCVTQ6X-WVVGMyNHA",
"version" : {
"number" : "7.10.0",
"build_flavor" : "default",
"build_type" : "tar",
"build_hash" : "51e9d6f22758d0374a0f3f5c6e8f3a7997850f96",
"build_date" : "2020-11-09T21:30:33.964949Z",
"build_snapshot" : false,
"lucene_version" : "8.7.0",
"minimum_wire_compatibility_version" : "6.8.0",
"minimum_index_compatibility_version" : "6.0.0-beta1"
},
"tagline" : "You Know, for Search"
}
通过jps命令可以看到elasticsearch进程
lihui@2023 ~ jps 65538 Elasticsearch 65831 Jps
既然elasticsearch是一个分布式系统,那么肯定支持高可用,有一个节点异常或者停止不会影响数据和服务
下面试着启动多个elasticsearch节点实例组成一个集群,多个elasticsearch节点实例可以修改配置文件的名称,或者直接命令行指定-E cluster.name=xxxx来指定,集群为demo,比如
lihui@2023 ~/elk/elasticsearch-7.10.0 bin/elasticsearch -E node.name=one -E cluster.name=demo -E path.data=one_data -d lihui@2023 ~/elk/elasticsearch-7.10.0 bin/elasticsearch -E node.name=two -E cluster.name=demo -E path.data=two_data -d lihui@2023 ~/elk/elasticsearch-7.10.0 bin/elasticsearch -E node.name=three -E cluster.name=demo -E path.data=three_data -d lihui@2023 ~/elk/elasticsearch-7.10.0 jps 66192 Elasticsearch 66089 Elasticsearch 66137 Elasticsearch 66202 Jps lihui@2023 ~/elk/elasticsearch-7.10.0 lsof -i:9200 COMMAND PID USER FD TYPE DEVICE SIZE/OFF NODE NAME java 66089 lihui 274u IPv6 0xd49f2a75bef7ea0d 0t0 TCP localhost:wap-wsp (LISTEN) java 66089 lihui 275u IPv6 0xd49f2a75bef7f64d 0t0 TCP localhost:wap-wsp (LISTEN) lihui@2023 ~/elk/elasticsearch-7.10.0 lsof -i:9201 COMMAND PID USER FD TYPE DEVICE SIZE/OFF NODE NAME java 66137 lihui 300u IPv6 0xd49f2a7595c047ad 0t0 TCP localhost:wap-wsp-wtp (LISTEN) java 66137 lihui 301u IPv6 0xd49f2a758a2492ed 0t0 TCP localhost:wap-wsp-wtp (LISTEN) lihui@2023 ~/elk/elasticsearch-7.10.0 lsof -i:9202 COMMAND PID USER FD TYPE DEVICE SIZE/OFF NODE NAME java 66192 lihui 313u IPv6 0xd49f2a75c0cdf90d 0t0 TCP localhost:wap-wsp-s (LISTEN) java 66192 lihui 327u IPv6 0xd49f2a75c0cdf2ed 0t0 TCP localhost:wap-wsp-s (LISTEN)
可以看到,的确是起了3个Java进程,也就是elasticsearch实例,端口也是9200-9202
接下来可以装一个Cerebro来查看elasticsearch节点的具体情况,下载地址:https://github.com/lmenezes/cerebro/releases/tag/v0.9.4
启动一下cerebro
lihui@2023 ~/elk/cerebro-0.9.4 bin/cerebro [info] play.api.Play - Application started (Prod) (no global state) [info] p.c.s.AkkaHttpServer - Listening for HTTP on /0:0:0:0:0:0:0:0:9000
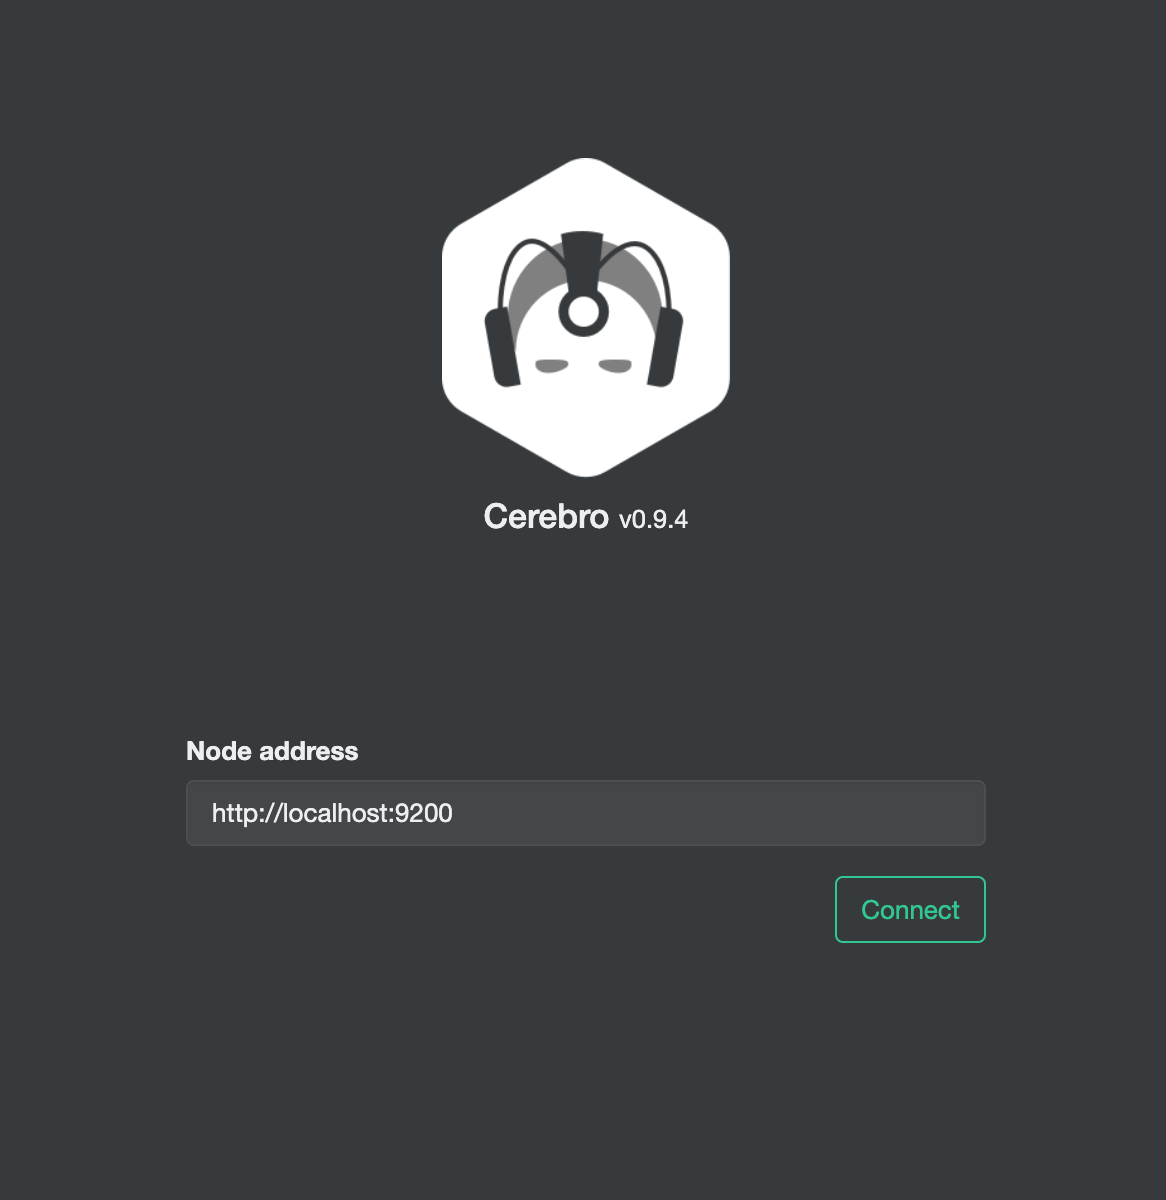
就会跳到web页面,Node地址也就是elasticsearch的地址,因为我是三个实例都在我本地一台机器上,因此直接输入9200即可
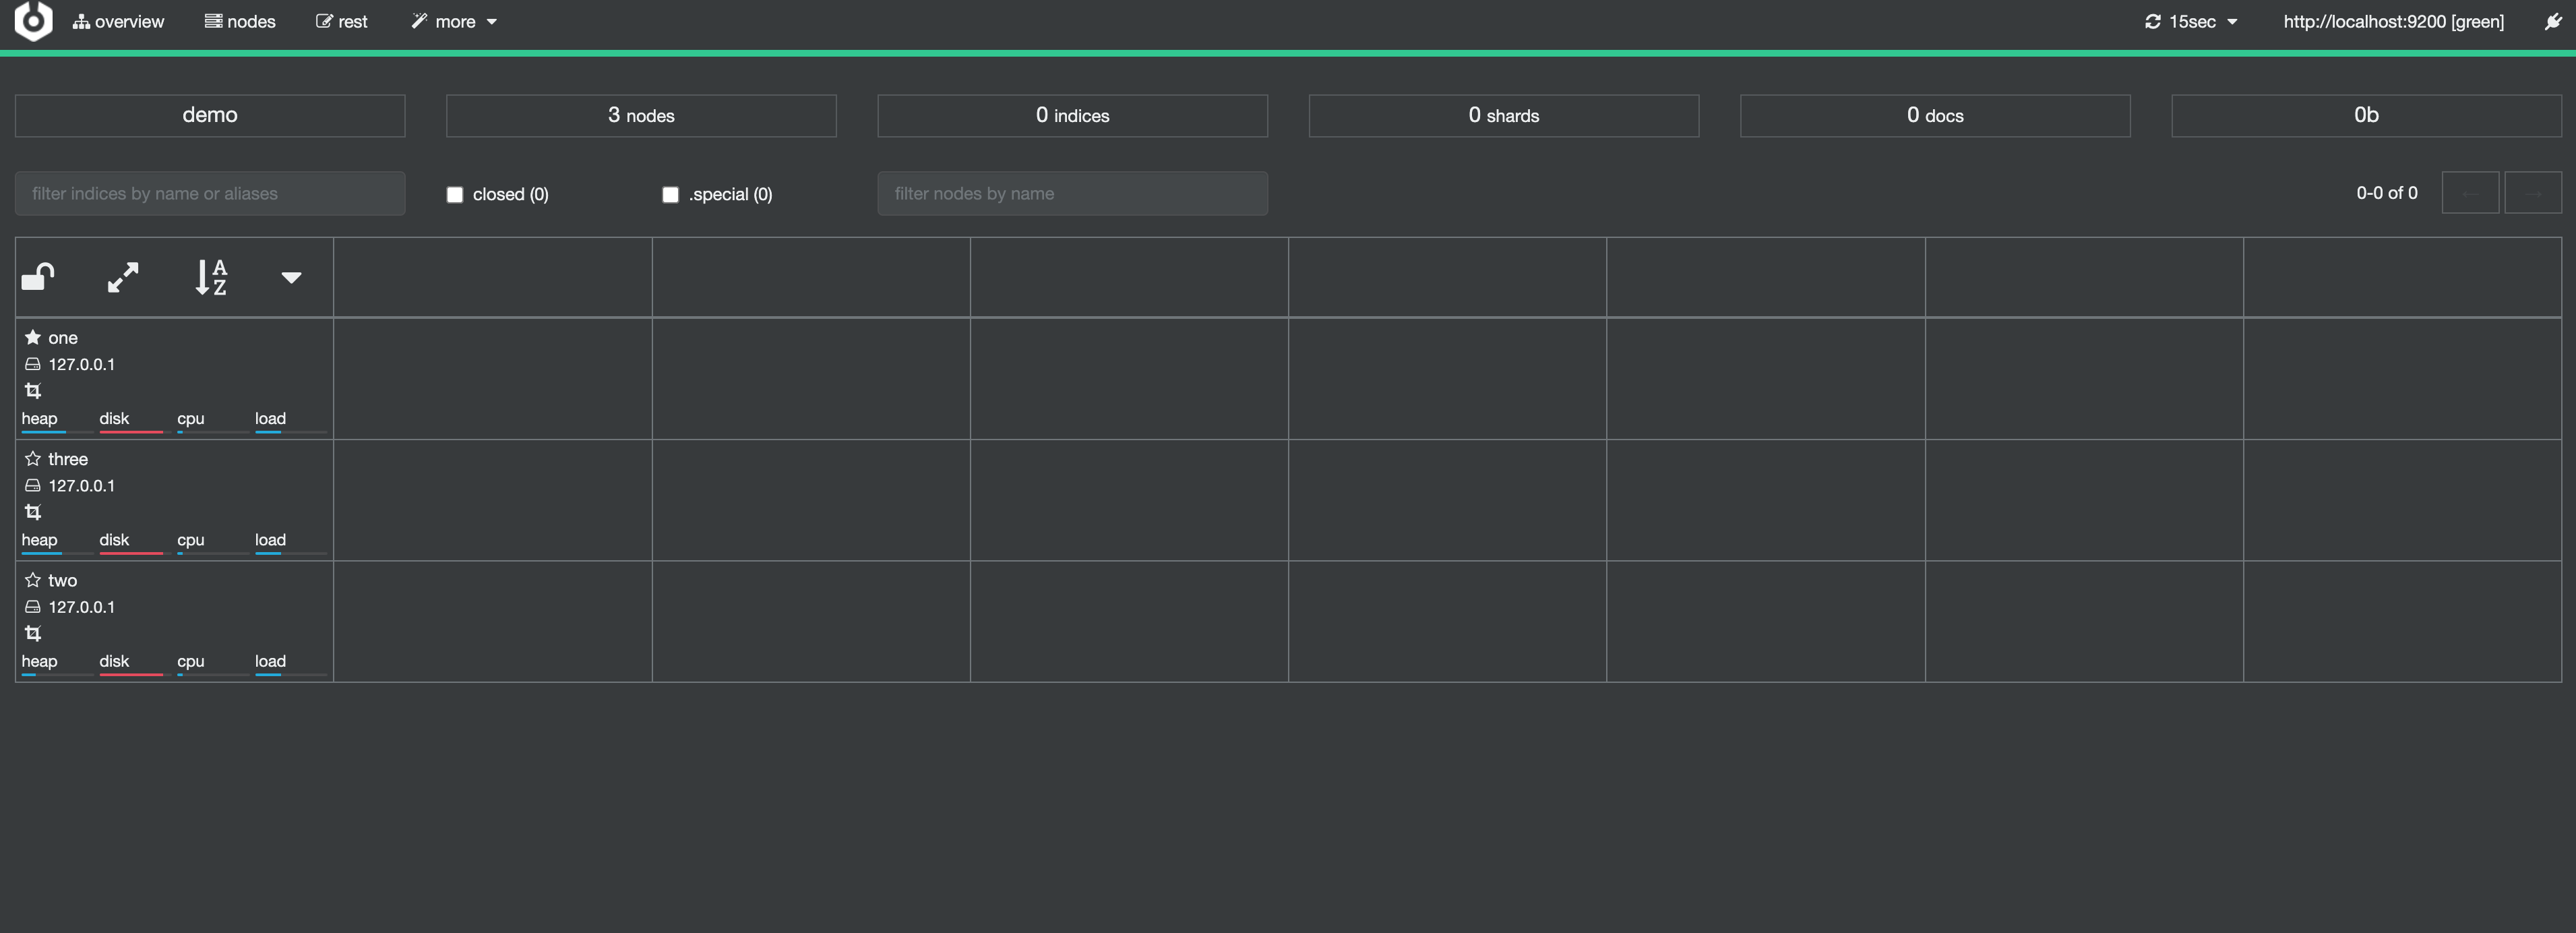
连接了之后,可以看到集群demo的所有elasticsearch实例信息,一共one,two,three三个node,都是部署在本地127.0.0.1,0个索引,0个分片,0个文档数据,存储了0b数据
具体主分片和副本的关系
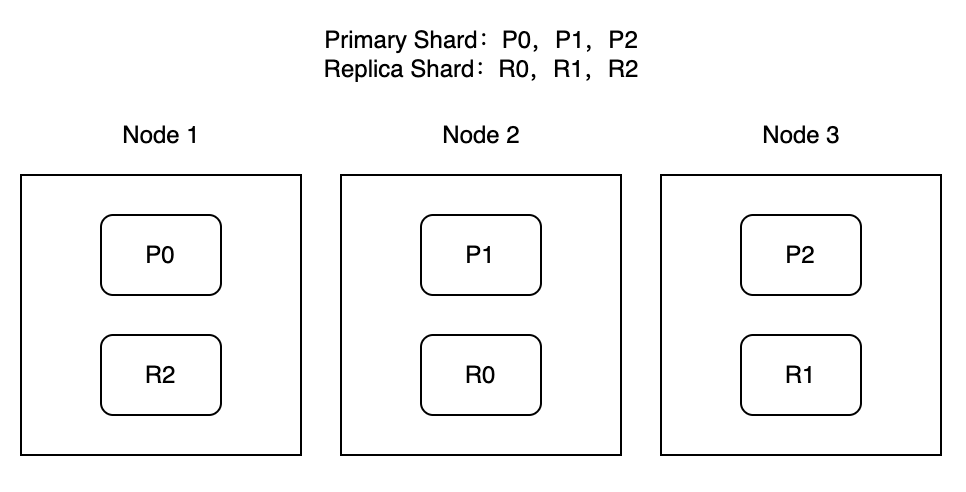
这里有主分片P0,P1,P2,分布在三个Node上,同时每个分片的副本都分布在和主分片不同的另一个Node上,既然是高可用,分片和副本肯定不能在同一个Node上,否则出现故障,数据就直接丢失了,分居在不同的Node,出现故障才能够进行切换转移,但有一点的是,在索引的创建时,必须是已经分片配置完毕了进行,假如索引已经分布在三个Node的分片中,此时又去扩容一个Node,原索引是不会分布在新扩容的Node上的
2、接着来看Kibana,它提供了对接elasticsearch的数据可视化,各版本下载链接:https://www.elastic.co/cn/downloads/past-releases#kibana
我这里下载的是7.10.0版本,开箱即用,需要注意的是这个配置,我本地起了3个实例,因此都要列出来
# The URLs of the Elasticsearch instances to use for all your queries.
elasticsearch.hosts: ["http://localhost:9200","http://localhost:9201","http://localhost:9202"]
假如kibana和elasticsearch不在同一个机器,这里可以指向elasticsearch对应的host
启动kibana:bin/kibana
报了个错,没启动成功
  log   [09:59:33.646] [error][data][elasticsearch] [resource_already_exists_exception]: index [.kibana_1/42rHlHt5RAmAe6xeywF3Cg] already exists
  log   [09:59:33.647] [warning][savedobjects-service] Unable to connect to Elasticsearch. Error: resource_already_exists_exception
  log   [09:59:33.648] [warning][savedobjects-service] Another Kibana instance appears to be migrating the index. Waiting for that migration to complete. If no other Kibana instance is attempting migrations, you can get past this message by deleting index .kibana_1 and restarting Kibana.
  log   [09:59:33.654] [info][savedobjects-service] Creating index .kibana_task_manager_1.
  log   [09:59:33.662] [error][data][elasticsearch] [resource_already_exists_exception]: index [.kibana_task_manager_1/mvyFrbD_TEC7EZVN7NVLEw] already exists
  log   [09:59:33.663] [warning][savedobjects-service] Unable to connect to Elasticsearch. Error: resource_already_exists_exception
  log   [09:59:33.663] [warning][savedobjects-service] Another Kibana instance appears to be migrating the index. Waiting for that migration to complete. If no other Kibana instance is attempting migrations, you can get past this message by deleting index .kibana_task_manager_1 and restarting Kibana.
google了一把,这也是奇葩了,我kibana和es版本完全一致,怎么会出现兼容性,支持矩阵在这里:https://www.elastic.co/cn/support/matrix#matrix_compatibility
按照网上做法操作了一把,删除了残留的
curl -XDELETE http://localhost:9200/.kibana*
但是依旧没暖用,奇葩,因此我就直接杀掉集群es进程了,只启动一个es实例,因此上面elasticsearch.hosts注释掉就行了,页面链接:http://localhost:5601
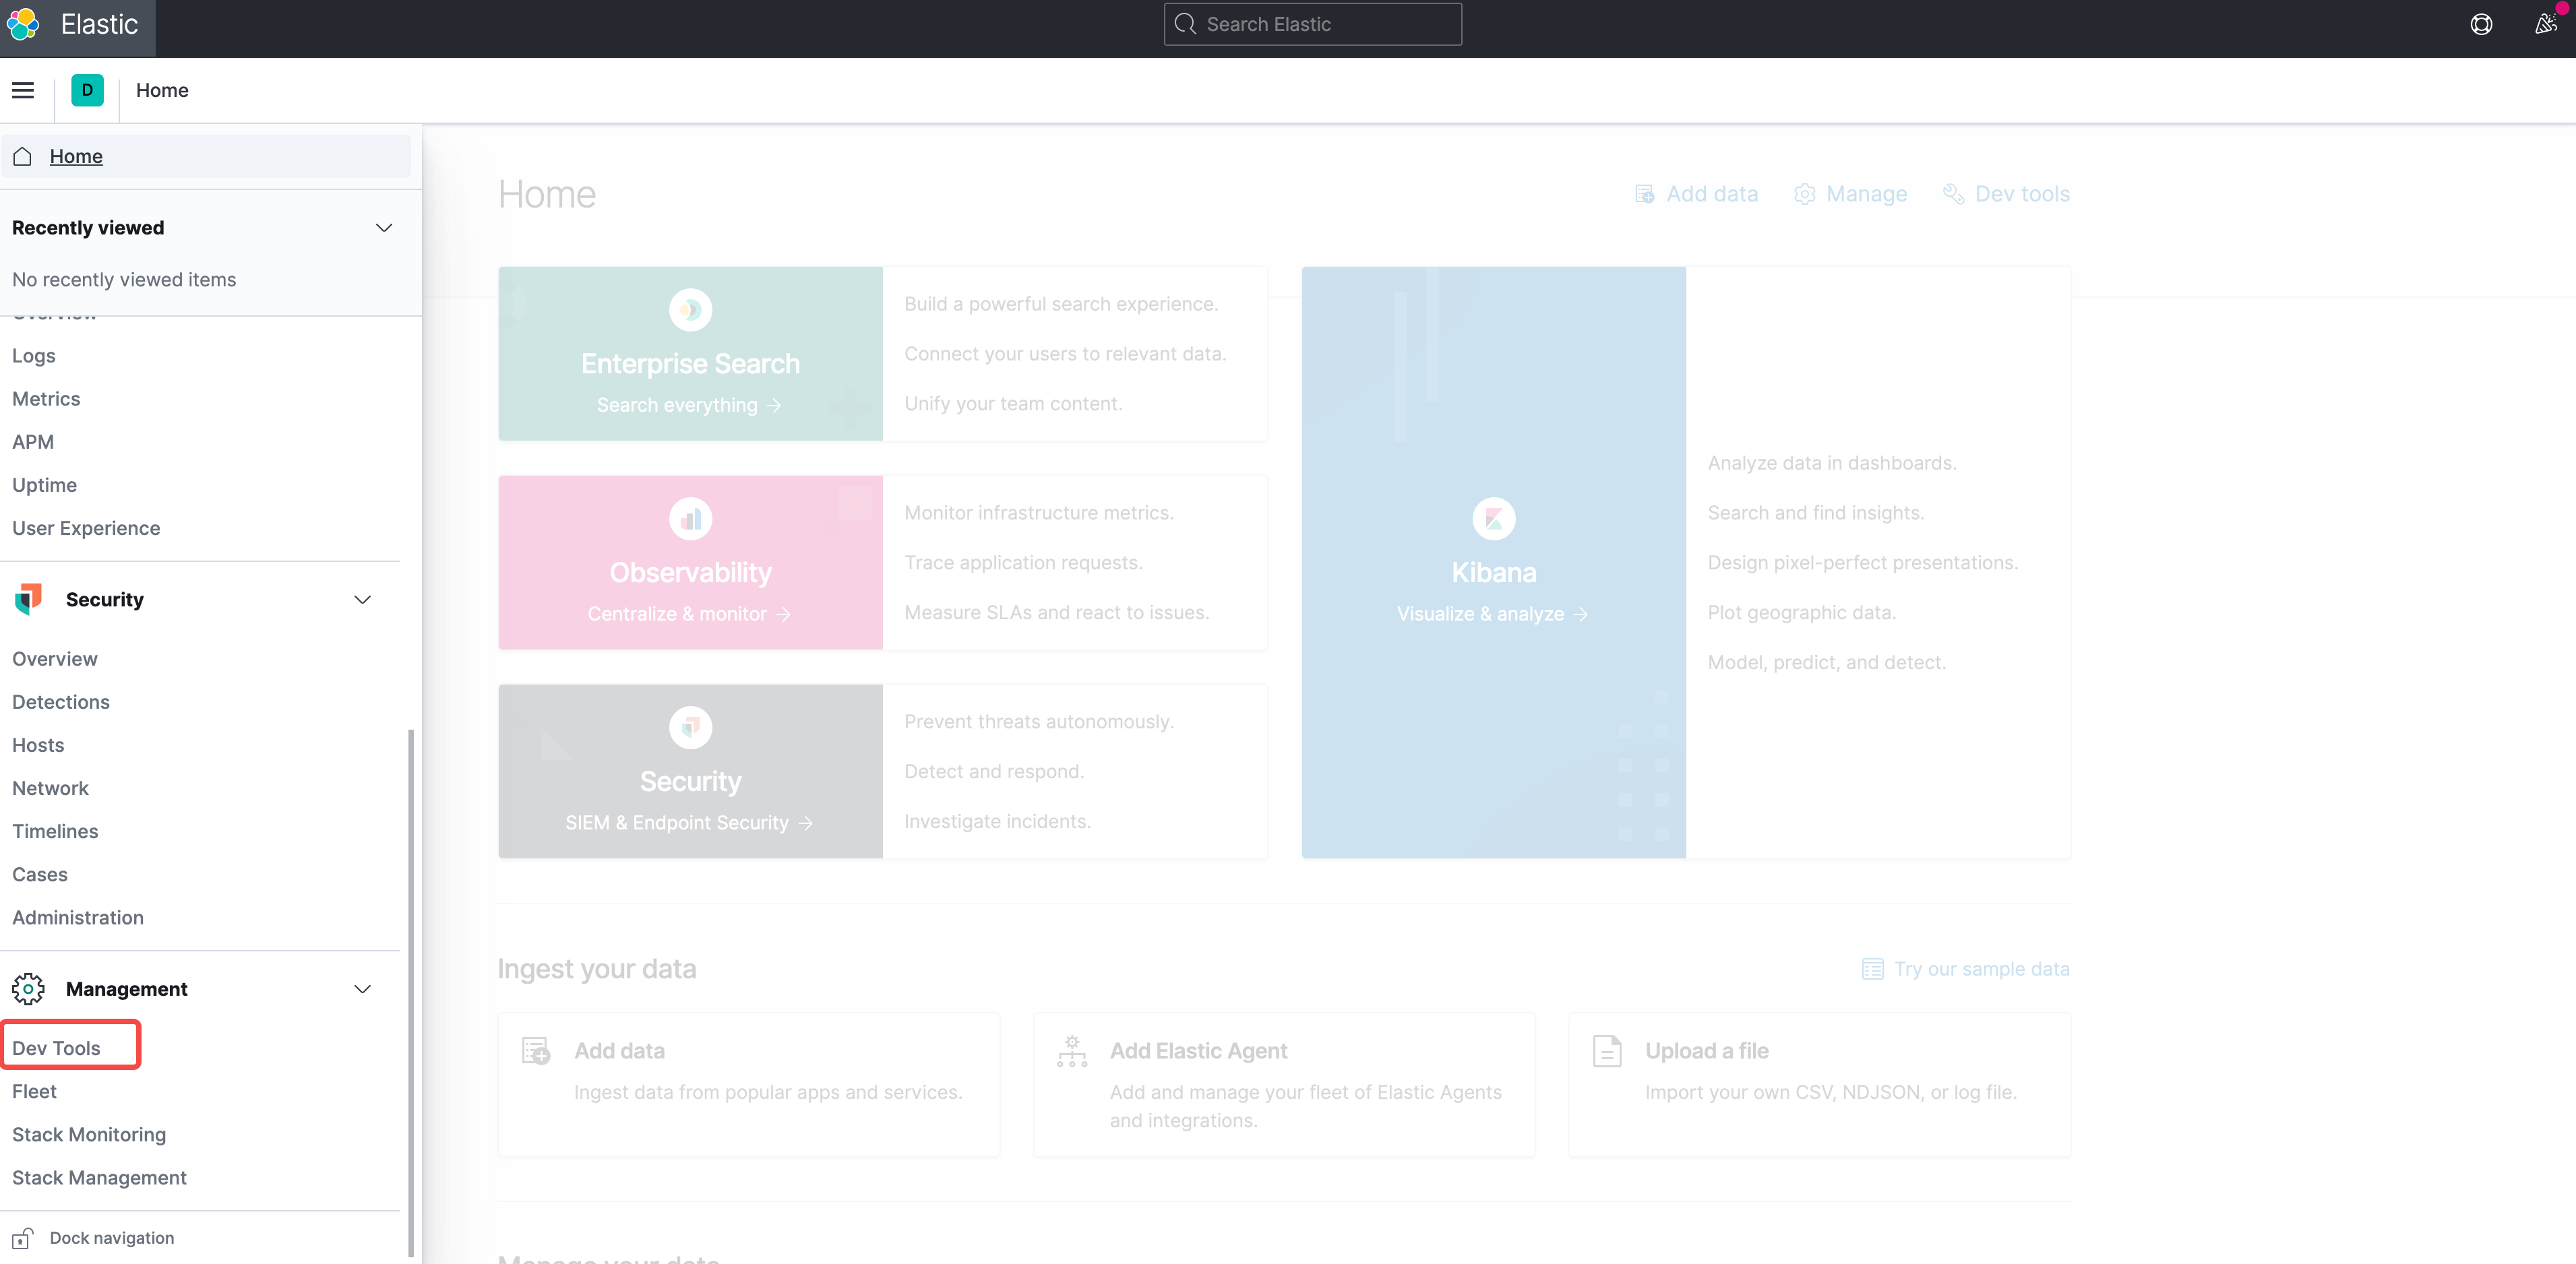
这个Dev Tools非常有用,可以调用API查看es相关的数据信息,比如看下集群情况,调用GET请求,_cluster/health即可
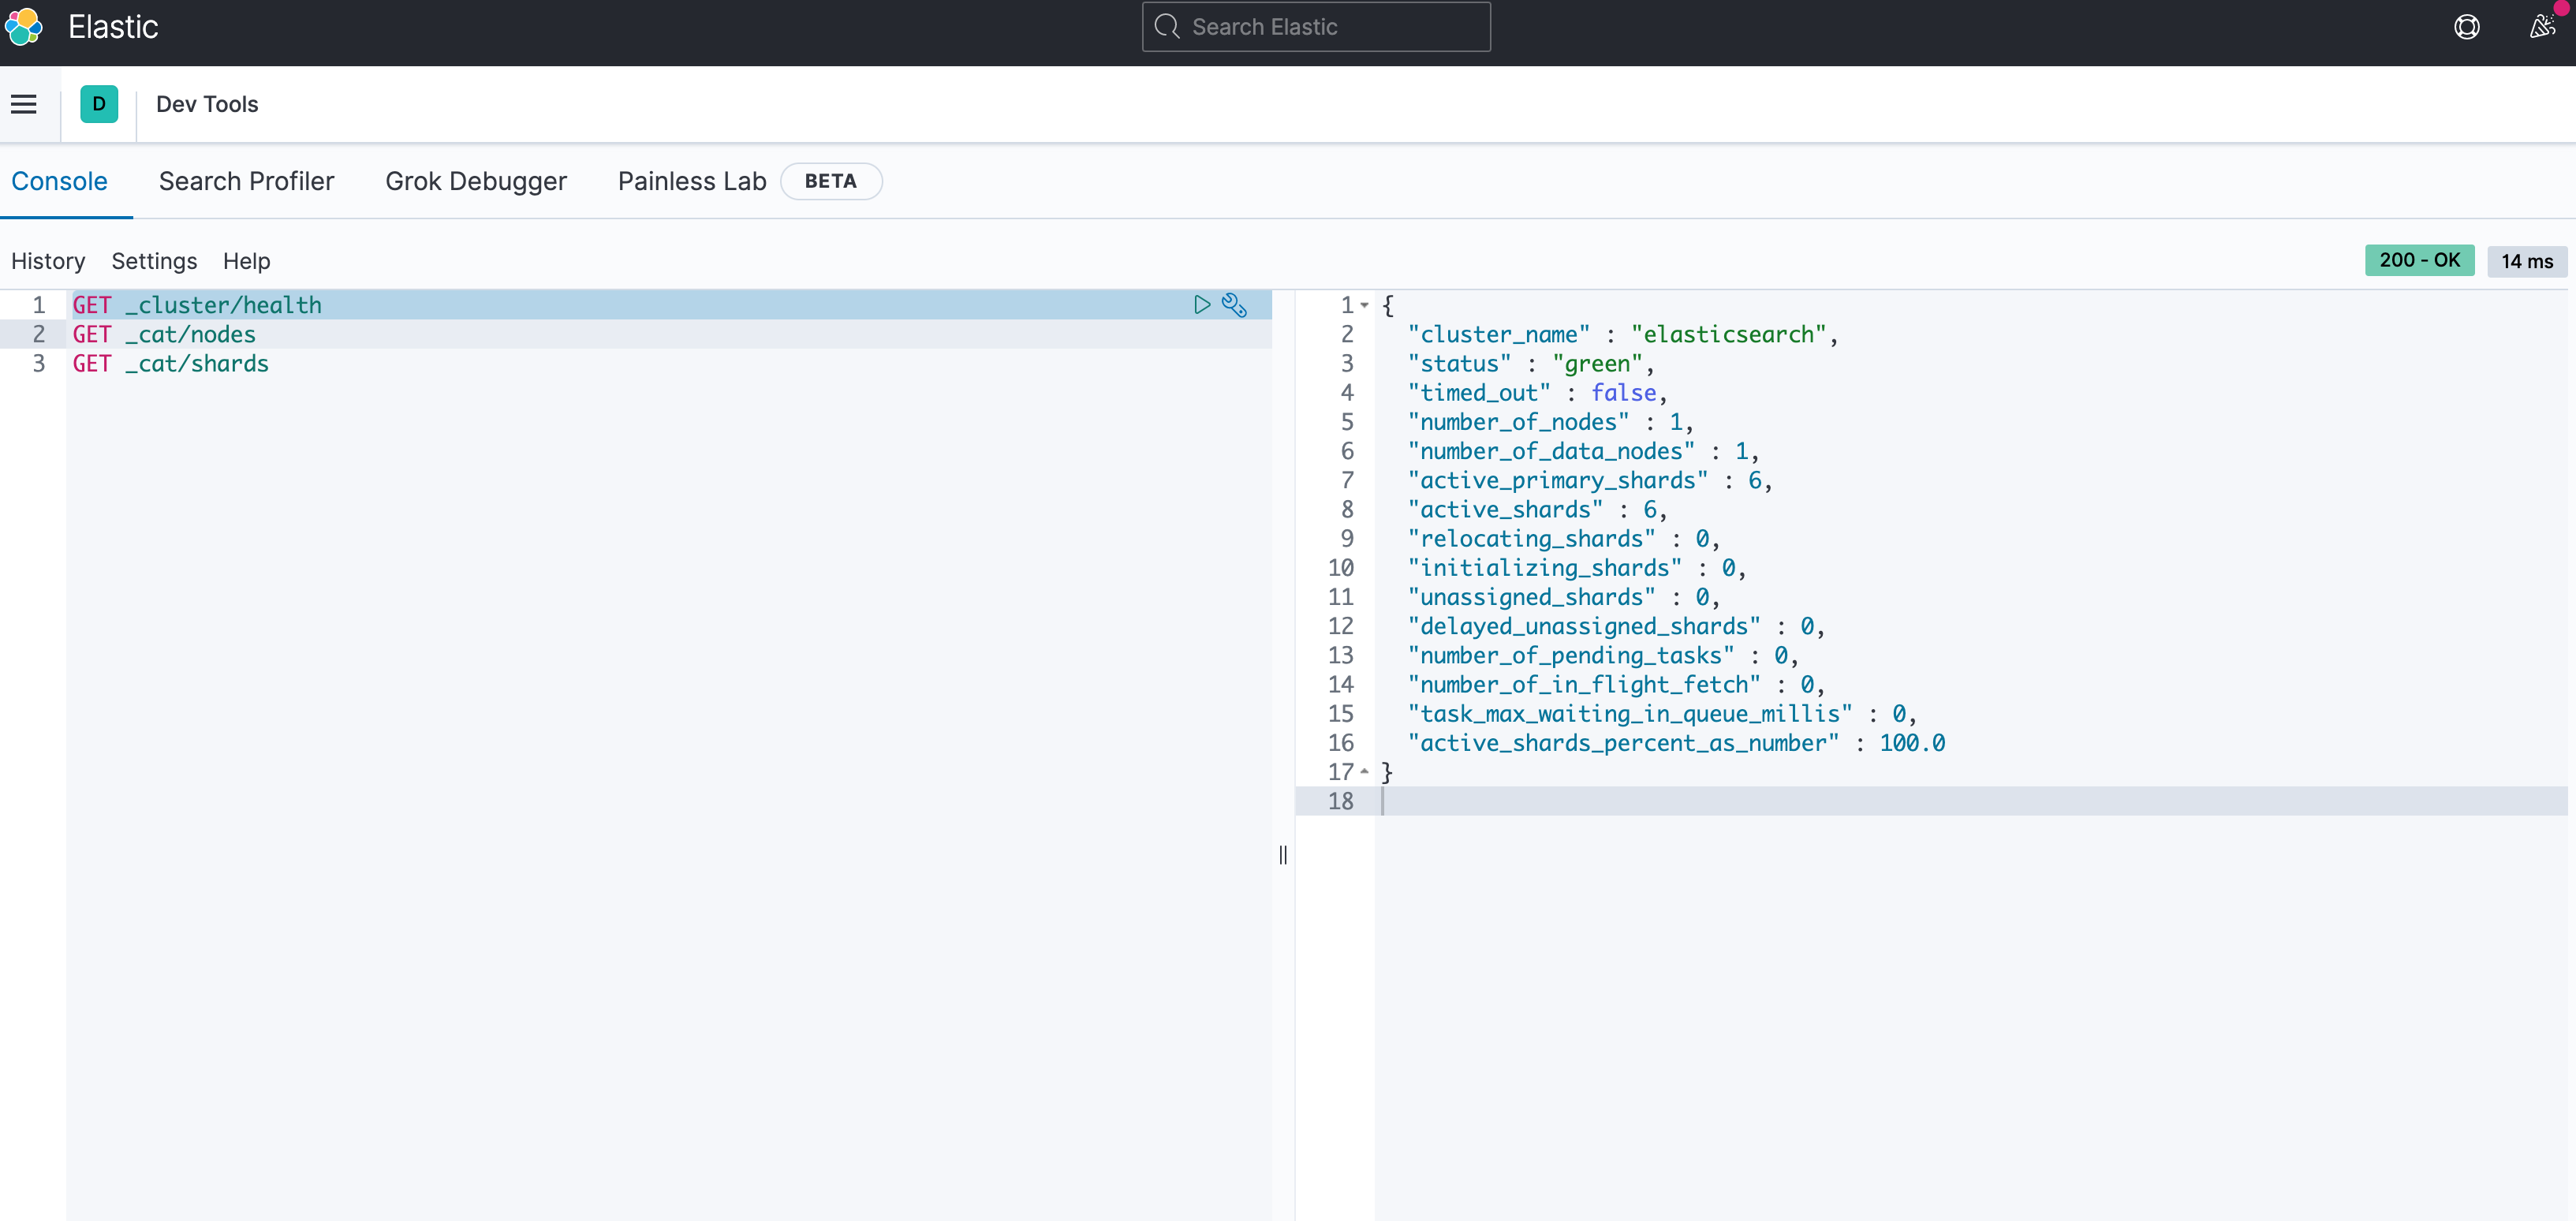
可以看到这是一个elasticsearch集群,状态green,说明正常,集群只有一个node,就是一个数据node,6个分片都是主分片,对比一下cerebro
这里集群有一个节点2023上,一共有6个索引,6个分片都是主分片,没有副本,数据有30docs,数据大小10.66MB

具体elasticsearch有些概念和传统sql数据库有点不一样,比如index不是B+Tree那索引,而是一类文档的集合,类比如下
|
RDBMS
|
ES
|
|
Table
|
Index
|
|
Row
|
Document
|
|
Colume
|
Field
|
|
Schema
|
Mapping
|
|
SQL
|
DSL
|
通过Kibana,可以查看es的任何数据信息;其实在这里可以通过API调用,来进行index和document的操作,但为了体现最终端到端的效果,数据部分还是放在后面进行
3、Logstash,数据进行采集,转换,过滤,输出,各版本下载地址:https://www.elastic.co/cn/downloads/past-releases#logstash
我这里下载的是7.10.0版本,下面做一个测试,将一个日志文件的数据,通过logstash读取,过滤,输出,写到es里
构造一个csv文件:user.csv
{"name":"lilei", "age":22, "url":"lilei.com"}
{"name":"lucy", "age":23, "url":"lucy.com"}
{"name":"lihao", "age":24, "url":"lihao.com"}
{"name":"lily", "age":25, "url":"lily.com"}
{"name":"hanmeimei", "age":26, "url":"haimeimei.com"}
{"name":"tom", "age":27, "url":"tom.com"}
这里作为源数据文件,接着新建logstash配置文件logstash.conf
input {
  file {
    path => "/Users/lihui/user.csv"
    start_position => "beginning"
    sincedb_path => "/dev/null"
  }
}

filter {

}

output {
  elasticsearch {
    hosts => "http://localhost:9200"
    index => "user"
    document_id => "%{id}"
  }
  stdout {}
}
这个配置文件,根据自勉意思看就很简单,input指定源文件,filter可以指定一些过滤规则,这里不指定,output指定过滤完之后,传输的方向,这里是传输给本地9200端口的es,写到索引user里
下面就可以指定配置文件启动logstash:./logstash -f logstash.conf
结果报了一个错
  Pipeline_id:main
  Plugin: "beginning", path=>["/Users/lihui/user.csv"], id=>"cb4f1782edea376545ea345a79bf77bd21052f6a3077abec87011b432c583322", sincedb_path=>"/dev/null", enable_metric=>true, codec=>"plain_d5a484b6-2475-4e82-a084-40bda805fd0b", enable_metric=>true, charset=>"UTF-8">, stat_interval=>1.0, discover_interval=>15, sincedb_write_interval=>15.0, delimiter=>"\n", close_older=>3600.0, mode=>"tail", file_completed_action=>"delete", sincedb_clean_after=>1209600.0, file_chunk_size=>32768, file_chunk_count=>140737488355327, file_sort_by=>"last_modified", file_sort_direction=>"asc", exit_after_read=>false, check_archive_validity=>false>
  Error: Permission denied - Permission denied
  Exception: Errno::EACCES
  Stack: org/jruby/RubyFile.java:1267:in `utime'
uri:classloader:/META-INF/jruby.home/lib/ruby/stdlib/fileutils.rb:1133:in `block in touch'
看着是权限问题,加上sudo执行即可:sudo ./logstash -f logstash.conf
终端输出下列写入es的内容
[2023-02-26T20:21:01,028][INFO ][logstash.javapipeline    ][main] Pipeline Java execution initialization time {"seconds"=>0.93}
[2023-02-26T20:21:01,236][INFO ][logstash.javapipeline    ][main] Pipeline started {"pipeline.id"=>"main"}
[2023-02-26T20:21:01,282][INFO ][filewatch.observingtail  ][main][cb4f1782edea376545ea345a79bf77bd21052f6a3077abec87011b432c583322] START, creating Discoverer, Watch with file and sincedb collections
[2023-02-26T20:21:01,305][INFO ][logstash.agent           ] Pipelines running {:count=>1, :running_pipelines=>[:main], :non_running_pipelines=>[]}
[2023-02-26T20:21:01,548][INFO ][logstash.agent           ] Successfully started Logstash API endpoint {:port=>9600}
{
       "message" => "{\"name\":\"lilei\", \"age\":22, \"url\":\"lilei.com\"}",
    "@timestamp" => 2023-02-26T12:21:01.647Z,
          "path" => "/Users/lihui/user.csv",
      "@version" => "1",
          "host" => "2023"
}
{
       "message" => "{\"name\":\"lihao\", \"age\":24, \"url\":\"lihao.com\"}",
    "@timestamp" => 2023-02-26T12:21:01.667Z,
          "path" => "/Users/lihui/user.csv",
      "@version" => "1",
          "host" => "2023"
}
{
       "message" => "{\"name\":\"tom\", \"age\":27, \"url\":\"tom.com\"}",
    "@timestamp" => 2023-02-26T12:21:01.668Z,
          "path" => "/Users/lihui/user.csv",
      "@version" => "1",
          "host" => "2023"
}
{
       "message" => "{\"name\":\"lucy\", \"age\":23, \"url\":\"lucy.com\"}",
    "@timestamp" => 2023-02-26T12:21:01.667Z,
          "path" => "/Users/lihui/user.csv",
      "@version" => "1",
          "host" => "2023"
}
{
       "message" => "{\"name\":\"hanmeimei\", \"age\":26, \"url\":\"haimeimei.com\"}",
    "@timestamp" => 2023-02-26T12:21:01.668Z,
          "path" => "/Users/lihui/user.csv",
      "@version" => "1",
          "host" => "2023"
}
{
       "message" => "{\"name\":\"lily\", \"age\":25, \"url\":\"lily.com\"}",
    "@timestamp" => 2023-02-26T12:21:01.668Z,
          "path" => "/Users/lihui/user.csv",
      "@version" => "1",
          "host" => "2023"
}
通过kibana可以看到logstash传入写到es的索引user的数据
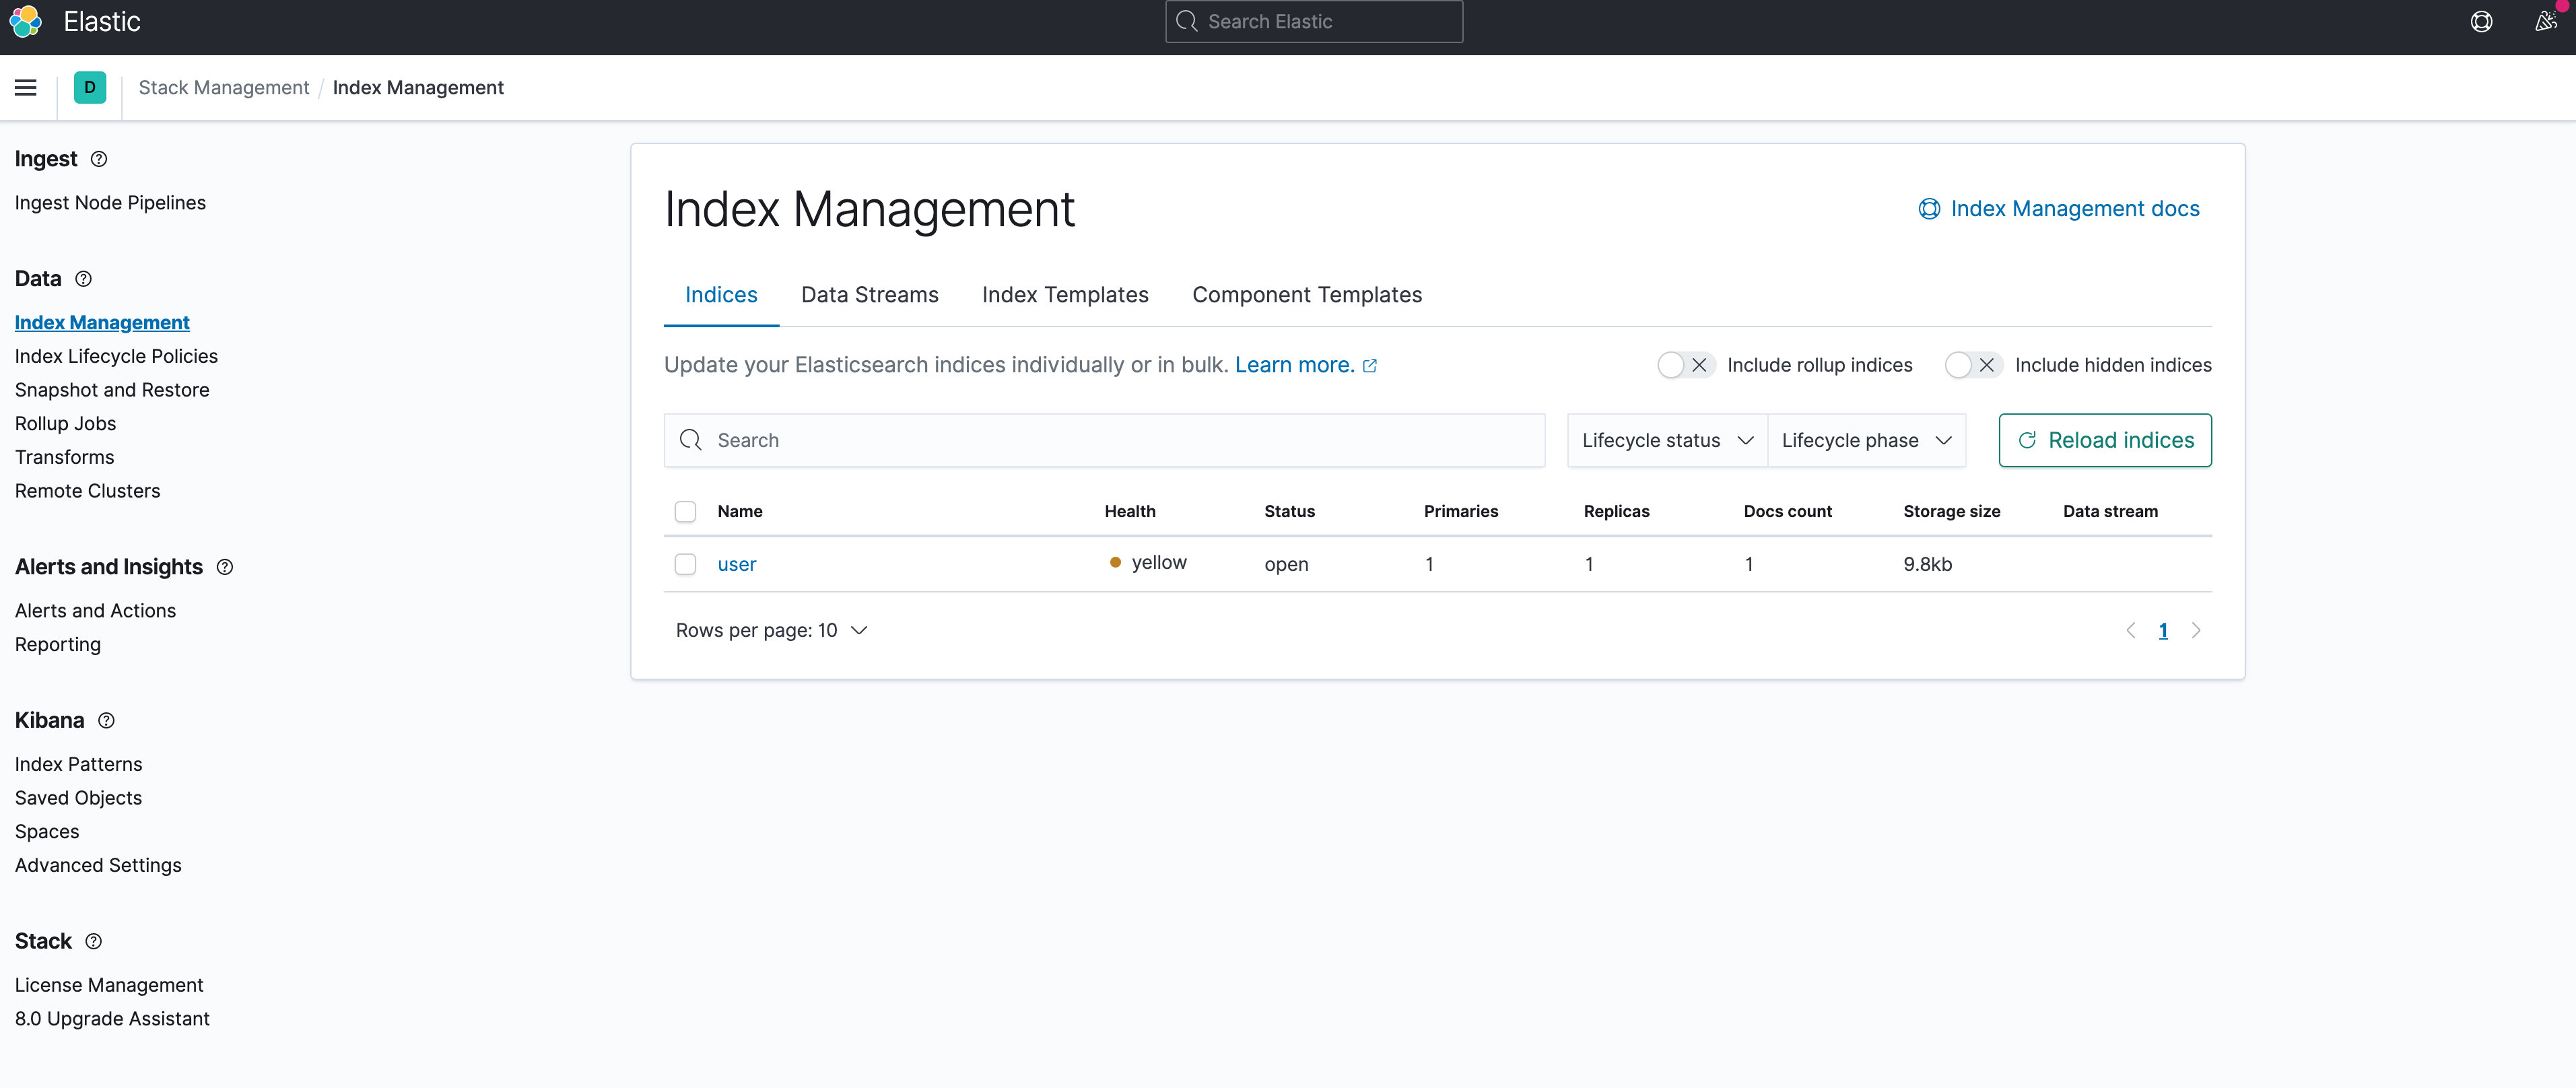
可以看到这里索引user的健康状态是yellow,而不是green,一般yellow的原因都是主分片是好的,副本状态异常,通过kibana查看一下shards
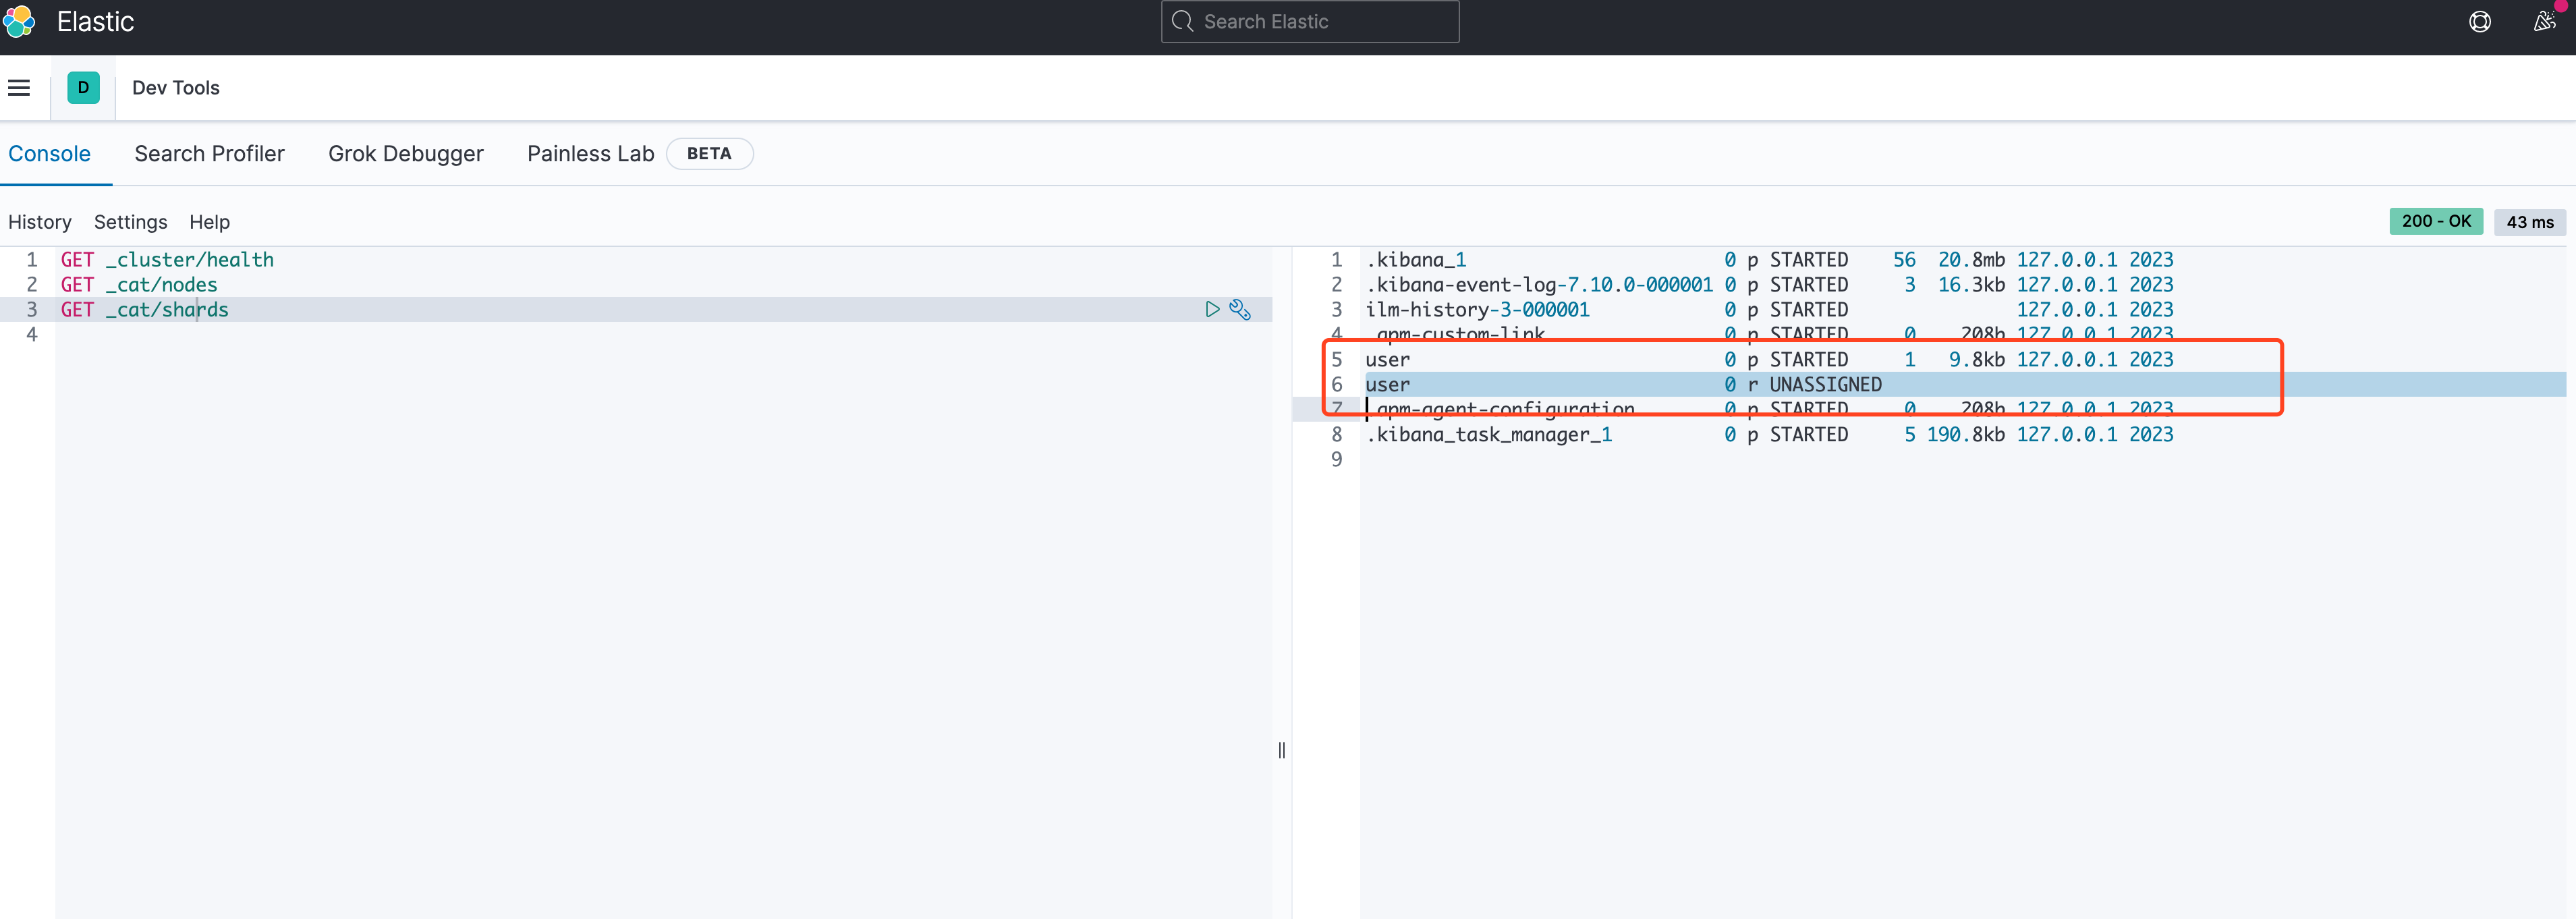
不出所料,user的副本异常,不过这也很简单理解,我是单节点部署,根本就不需要副本,因此直接删掉就好了,kibana直接操作
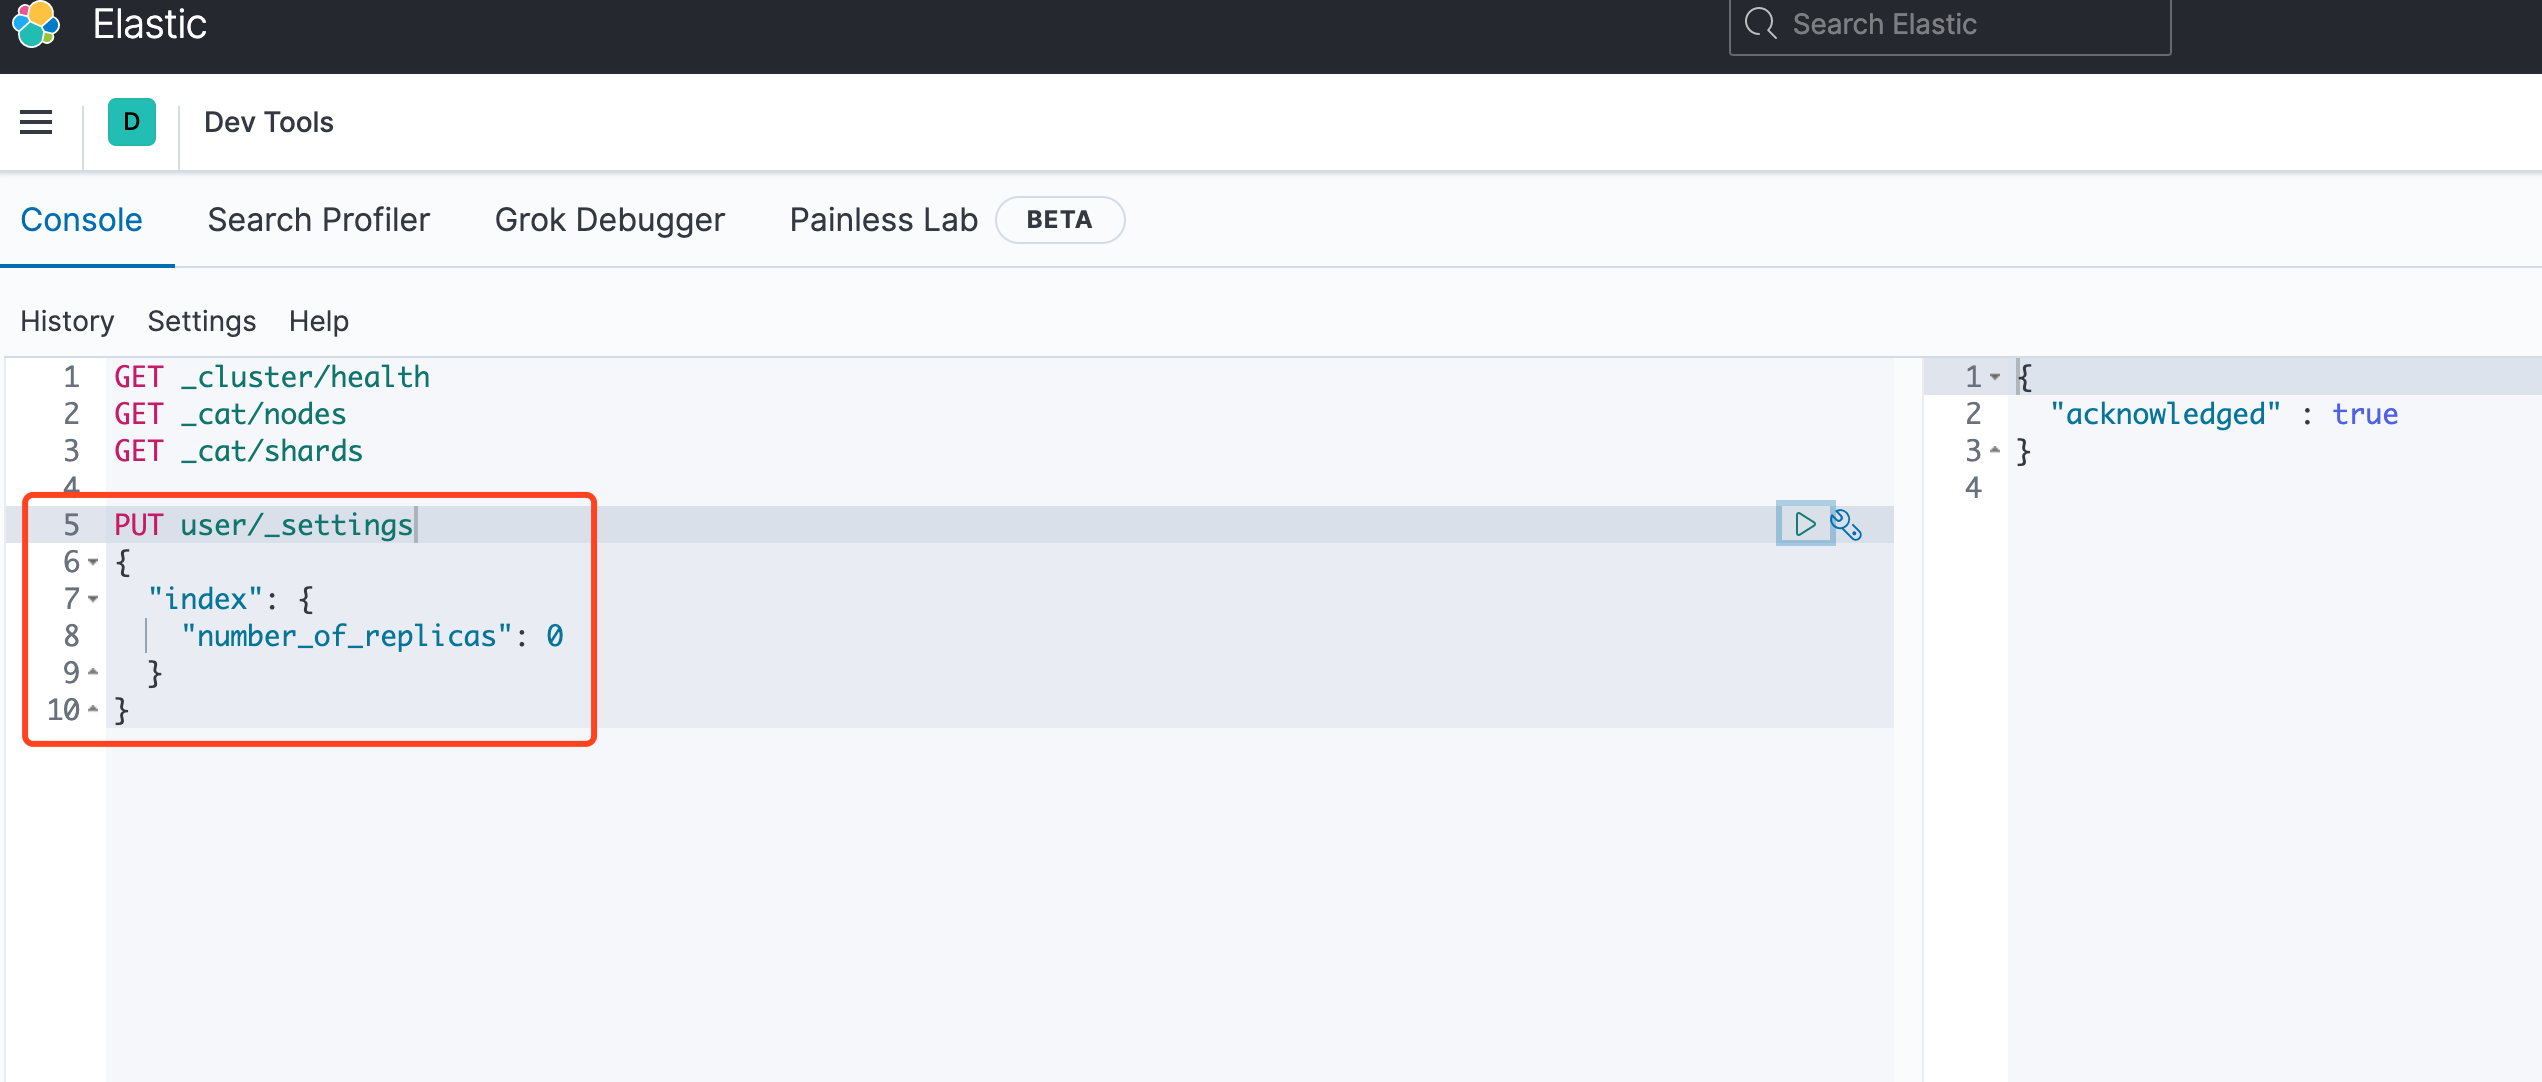
这样,就恢复正常了
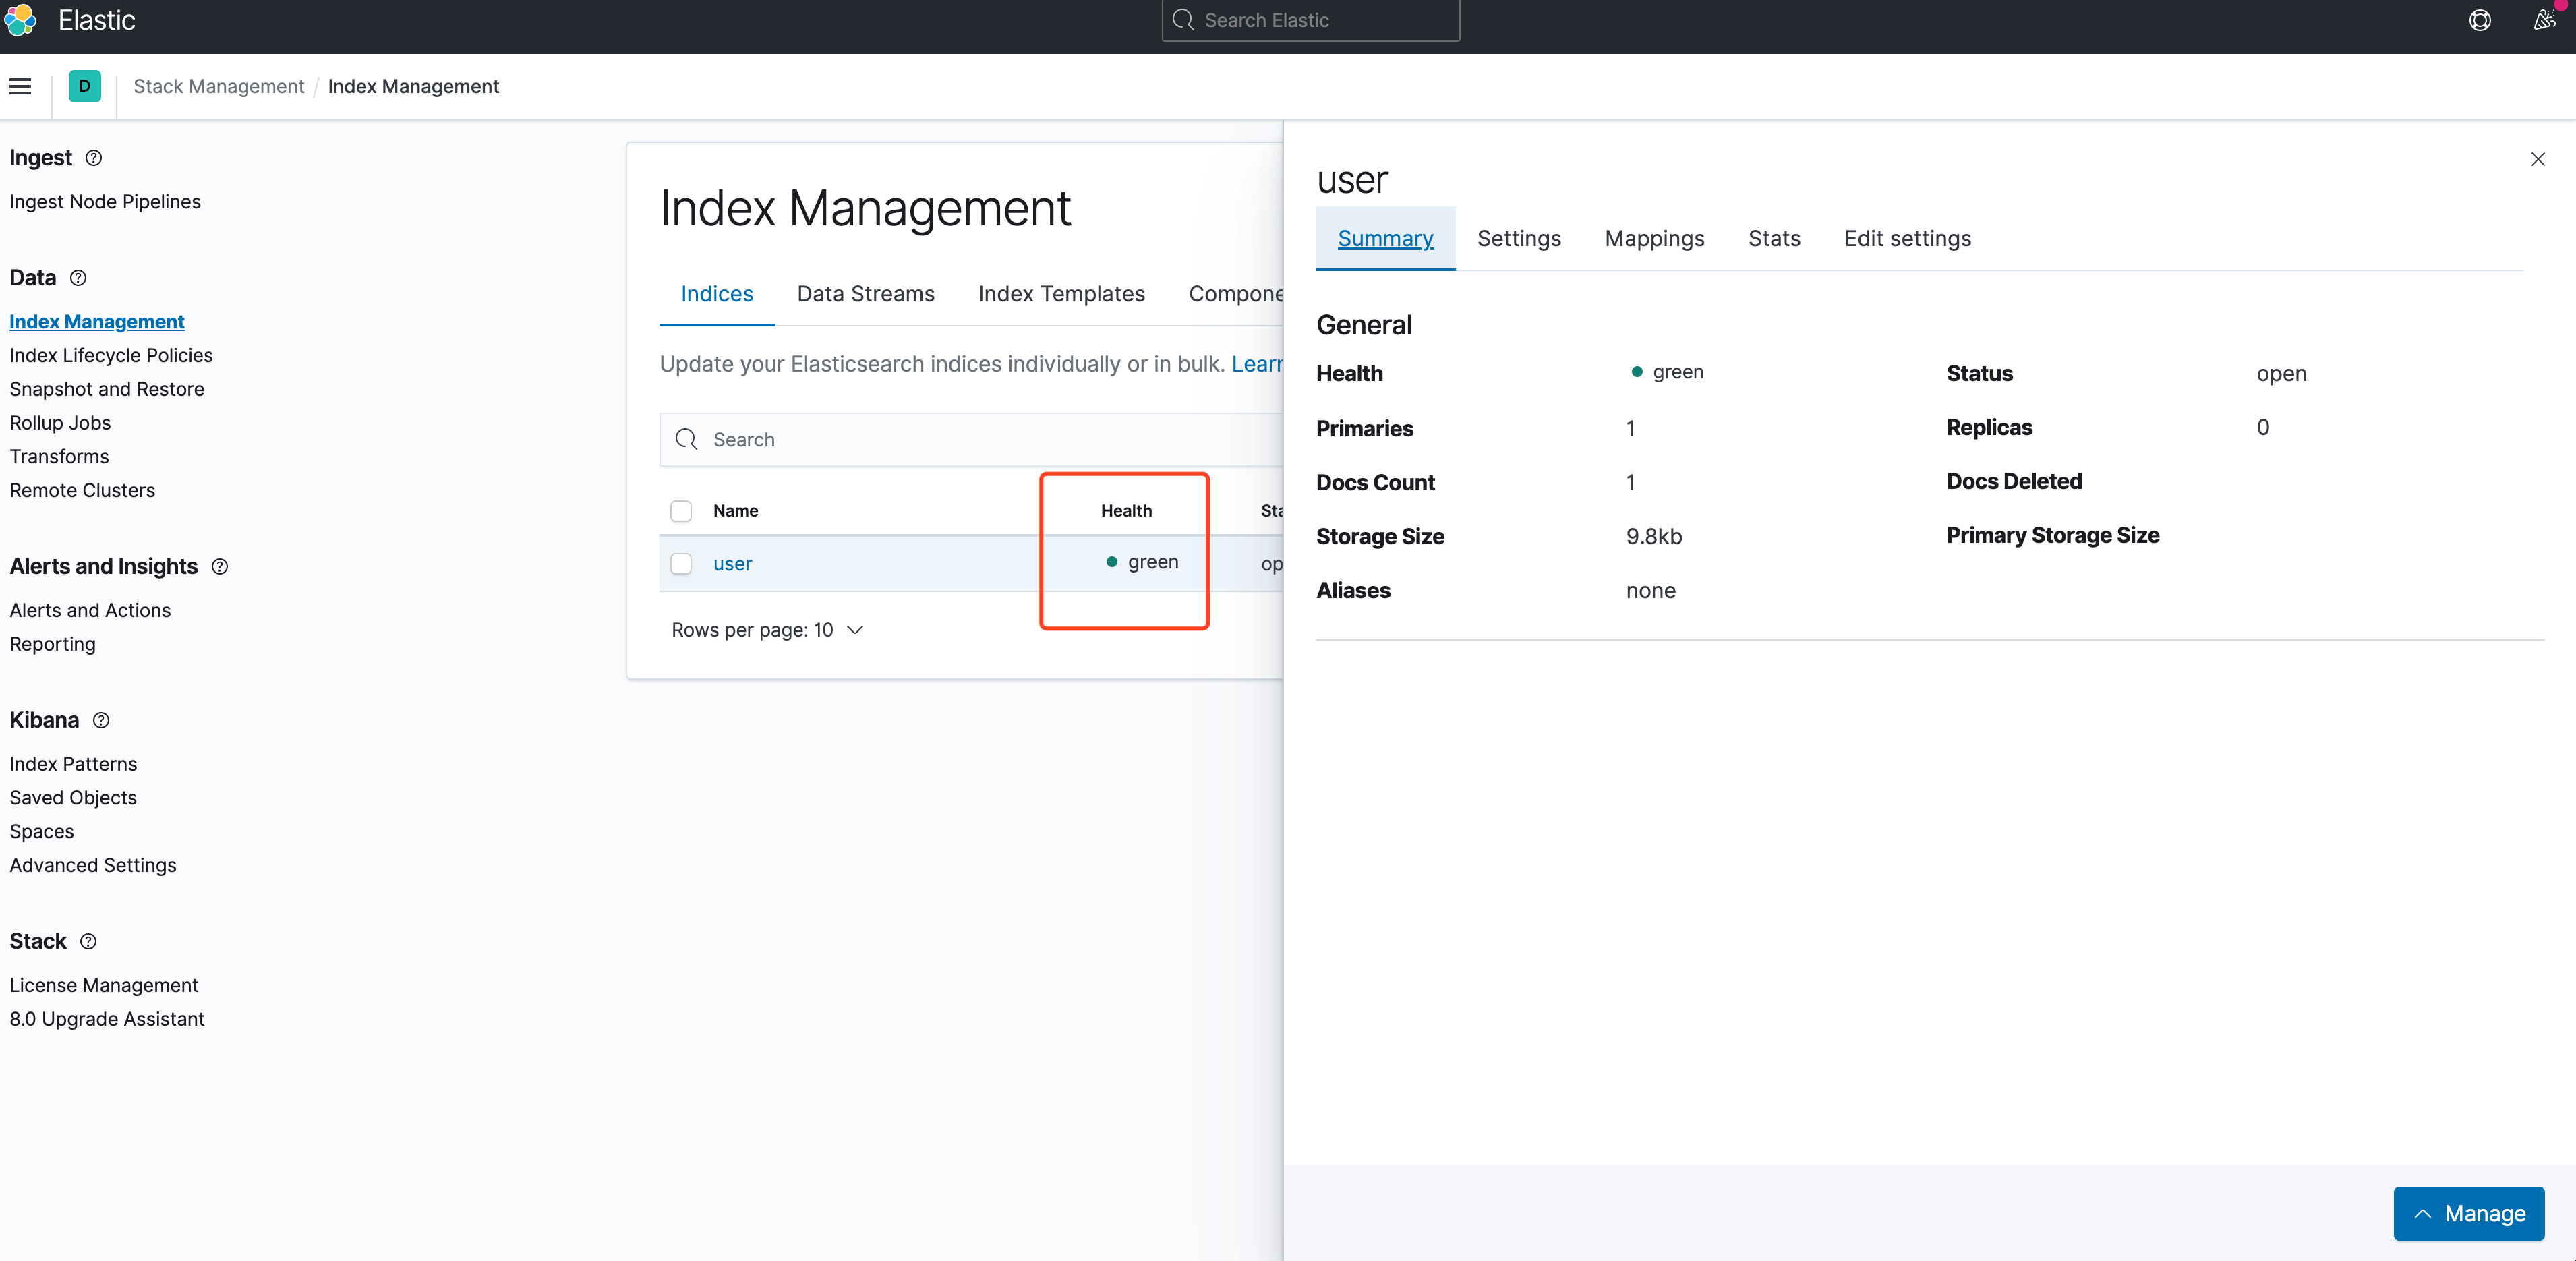
这样,csv数据就通过logstash写入了es里
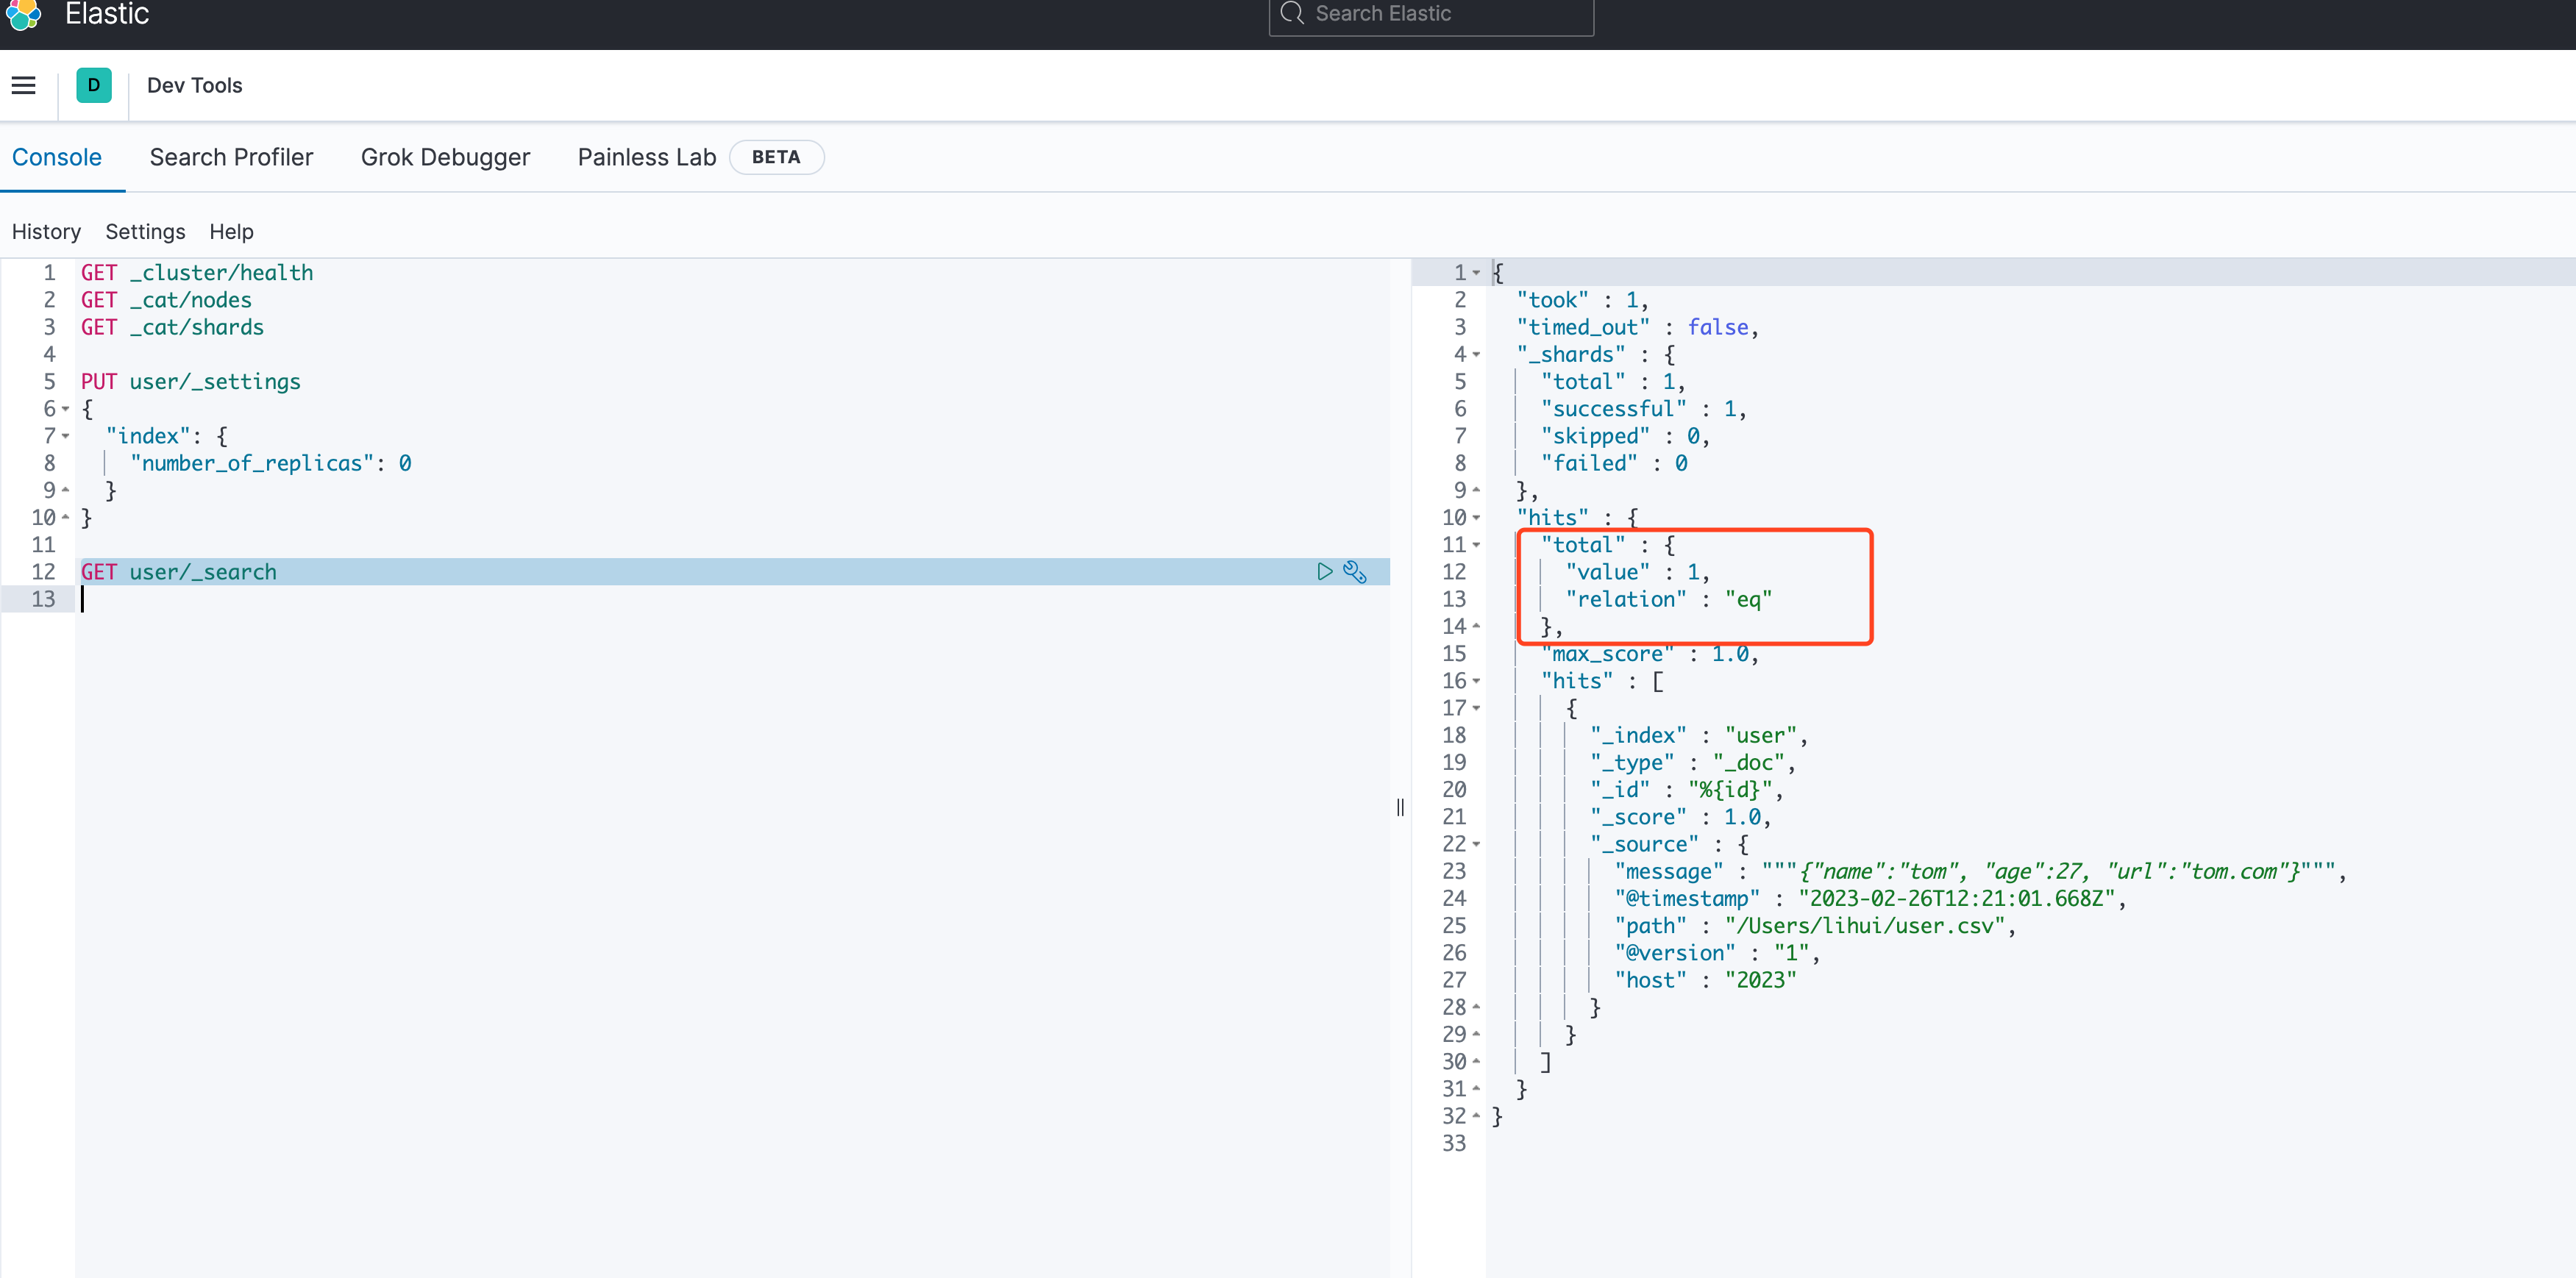
这里有个问题,只写进去了一条数据,原因我猜是主键_id没有赋值成功,导致后面几条数据_id都没变,从而变成了update操作,而不是新插入,将logstash.conf文件里的document_id不用指定,文档数据库主键都是字符串,应该会自动生成一个,重新操作了一遍,在Discover里的确可以查到相关的message
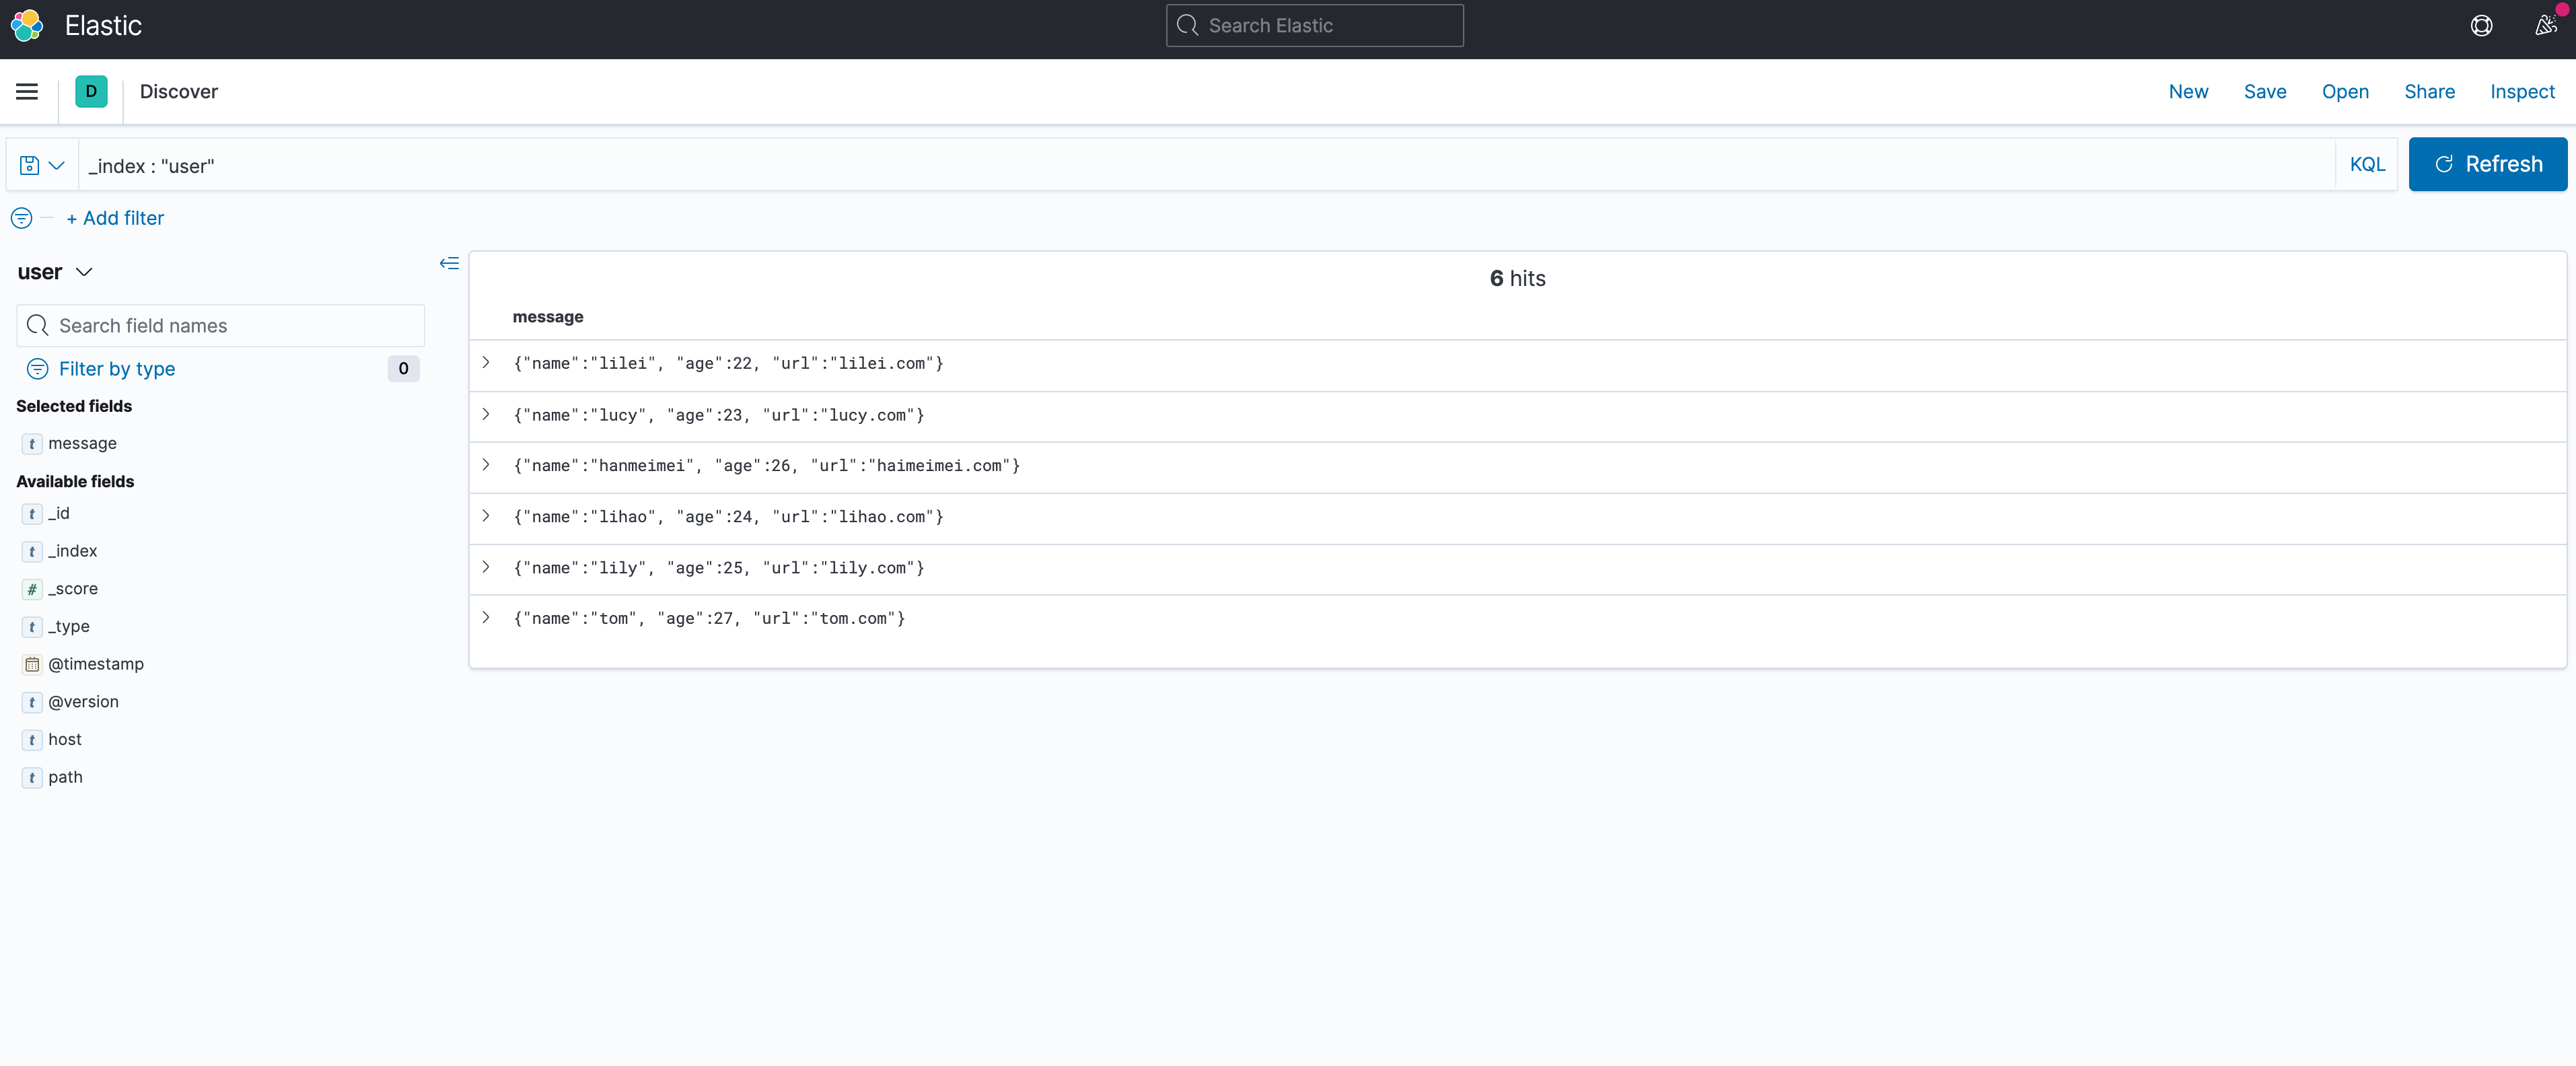
因此这里就是logstash通过采集文本日志数据,中间经过filter,重新组装后,传到elasticsearch存起来,进而可以提供用户查询,比如通过kibana可以进行搜索;而logstash的数据源除了直接从file里读取,还可以stdin,filebeat,kafka,redis等等都是可以的,比如轻量级的采数工具filebeat
4、Filebeat
这玩意非常轻量级,go语言写的,用来采集数据效率很高,下载各版本链接:
https://www.elastic.co/cn/downloads/past-releases#filebeat
我下载的依旧是7.10.0版本,这下用它来采集,logstash收数过滤传输给es,因此需要修改配置数据源流向
测试日志文件demo.log
2023-02-26T22:00:00Z The first Document
2023-02-26T22:01:00Z The second Document
2023-02-26T22:02:00Z The third Document
2023-02-26T22:03:00Z The fourth Document
2023-02-26T22:04:00Z The fifth Document
2023-02-26T22:05:00Z The sixth Document
2023-02-26T22:06:00Z The seventh Document
2023-02-26T22:07:00Z The eighth Document
2023-02-26T22:08:00Z The nighth Document
2023-02-26T22:09:00Z The tenth Document
filebeat-demo.yml配置文件,指定input数据源文件,output指向logstash
filebeat.inputs:
  type: log
  enabled: true
  paths:
    ./demo.log

output.logstash:
  hosts: [“localhost:8888"]
logstash.conf配置文件,指定input来自filebeat,output指向elasticsearch,中间加一个过滤条件
input {
  beats {
    port => 8888
  }
}

filter {
  grok {
    match => [
      "message", "%{TIMESTAMP_ISO8601:timestamp_string}%{SPACE}%{GREEDYDATA:line}"
    ]
  }

  date {
    match => ["timestamp_string", "ISO8601"]
  }

  mutate {
    remove_field => [message, timestamp_string]
  }
}

output {
  elasticsearch {
    hosts => "http://localhost:9200"
    document_type => "_doc"
    index => "demo"
  }
  stdout {
    codec => rubydebug
  }
}
这里grok的match类似正则表达式,timestamp_string保存匹配了时间部分的字符串,SPACE匹配空格,line保存匹配了后面字符串内容
这里date可以将timestamp_string变成ISO8601的时间,存在@timestamp字段里,如果没有此变化,@timestamp就是运行的时间,而不是log日志里的时间
这里mutate把之前的message和timestamp_string都删掉
启动logstash,配置的端口是8888,因此filebeat配置里指定8888端口
[2023-02-26T22:19:12,031][INFO ][logstash.javapipeline    ][main] Pipeline Java execution initialization time {"seconds"=>0.97}
[2023-02-26T22:19:12,057][INFO ][logstash.inputs.beats    ][main] Beats inputs: Starting input listener {:address=>"0.0.0.0:8888"}
[2023-02-26T22:19:12,085][INFO ][logstash.javapipeline    ][main] Pipeline started {"pipeline.id"=>"main"}
[2023-02-26T22:19:12,159][INFO ][logstash.agent           ] Pipelines running {:count=>1, :running_pipelines=>[:main], :non_running_pipelines=>[]}
[2023-02-26T22:19:12,221][INFO ][org.logstash.beats.Server][main][1da348c69b339b6e040093af28eaebe2fa75547c695d42ba57cc09a242ef50a7] Starting server on port: 8888
[2023-02-26T22:19:12,447][INFO ][logstash.agent           ] Successfully started Logstash API endpoint {:port=>9600}
启动filebeat,报了一个错
./filebeat -c filebeat-demo.yml
Exiting: no modules or inputs enabled and configuration reloading disabled. What files do you want me to watch?
坑,配置文件少了两道杠
filebeat.inputs:
- type: log
  enabled: true
  paths:
    - ./demo.log

output.logstash:
  hosts: ["localhost:8888"]
这样就可以了;当采集了demo.log之后,传给logstash,就会打印日志
[2023-02-26T22:19:12,221][INFO ][org.logstash.beats.Server][main][1da348c69b339b6e040093af28eaebe2fa75547c695d42ba57cc09a242ef50a7] Starting server on port: 8888
[2023-02-26T22:19:12,447][INFO ][logstash.agent           ] Successfully started Logstash API endpoint {:port=>9600}


{
      "@version" => "1",
           "ecs" => {
        "version" => "1.6.0"
    },
         "agent" => {
                "name" => "2023",
                  "id" => "c171d8ac-3546-44d4-a156-73aef217e0c4",
                "type" => "filebeat",
             "version" => "7.10.0",
        "ephemeral_id" => "144bc0ef-4562-4d65-91de-6f58b40217b0",
            "hostname" => "2023"
    },
          "tags" => [
        [0] "beats_input_codec_plain_applied"
    ],
           "log" => {
          "file" => {
            "path" => "/Users/lihui/elk/filebeat-7.10.0-darwin-x86_64/demo.log"
        },
        "offset" => 202
    },
          "line" => "The sixth Document",
    "@timestamp" => 2023-02-26T22:05:00.000Z,
          "host" => {
        "name" => "2023"
    },
         "input" => {
        "type" => "log"
    }
}
{
      "@version" => "1",
           "ecs" => {
        "version" => "1.6.0"
    },
         "agent" => {
                "name" => "2023",
                  "id" => "c171d8ac-3546-44d4-a156-73aef217e0c4",
                "type" => "filebeat",
             "version" => "7.10.0",
        "ephemeral_id" => "144bc0ef-4562-4d65-91de-6f58b40217b0",
            "hostname" => "2023"
    },
          "tags" => [
        [0] "beats_input_codec_plain_applied"
    ],
           "log" => {
          "file" => {
            "path" => "/Users/lihui/elk/filebeat-7.10.0-darwin-x86_64/demo.log"
        },
        "offset" => 40
    },
          "line" => "The second Document",
    "@timestamp" => 2023-02-26T22:01:00.000Z,
          "host" => {
        "name" => "2023"
    },
         "input" => {
        "type" => "log"
    }
}
{
      "@version" => "1",
           "ecs" => {
        "version" => "1.6.0"
    },
         "agent" => {
                "name" => "2023",
                  "id" => "c171d8ac-3546-44d4-a156-73aef217e0c4",
                "type" => "filebeat",
             "version" => "7.10.0",
        "ephemeral_id" => "144bc0ef-4562-4d65-91de-6f58b40217b0",
            "hostname" => "2023"
    },
          "tags" => [
        [0] "beats_input_codec_plain_applied"
    ],
           "log" => {
          "file" => {
            "path" => "/Users/lihui/elk/filebeat-7.10.0-darwin-x86_64/demo.log"
        },
        "offset" => 366
    },
          "line" => "The tenth Document",
    "@timestamp" => 2023-02-26T22:09:00.000Z,
         "input" => {
        "type" => "log"
    },
          "host" => {
        "name" => "2023"
    }
}
{
      "@version" => "1",
           "ecs" => {
        "version" => "1.6.0"
    },
         "agent" => {
                "name" => "2023",
                  "id" => "c171d8ac-3546-44d4-a156-73aef217e0c4",
                "type" => "filebeat",
             "version" => "7.10.0",
        "ephemeral_id" => "144bc0ef-4562-4d65-91de-6f58b40217b0",
            "hostname" => "2023"
    },
          "tags" => [
        [0] "beats_input_codec_plain_applied"
    ],
           "log" => {
          "file" => {
            "path" => "/Users/lihui/elk/filebeat-7.10.0-darwin-x86_64/demo.log"
        },
        "offset" => 81
    },
          "line" => "The third Document",
    "@timestamp" => 2023-02-26T22:02:00.000Z,
         "input" => {
        "type" => "log"
    },
          "host" => {
        "name" => "2023"
    }
}
{
      "@version" => "1",
           "ecs" => {
        "version" => "1.6.0"
    },
         "agent" => {
                "name" => "2023",
                "type" => "filebeat",
                  "id" => "c171d8ac-3546-44d4-a156-73aef217e0c4",
             "version" => "7.10.0",
        "ephemeral_id" => "144bc0ef-4562-4d65-91de-6f58b40217b0",
            "hostname" => "2023"
    },
          "tags" => [
        [0] "beats_input_codec_plain_applied"
    ],
           "log" => {
          "file" => {
            "path" => "/Users/lihui/elk/filebeat-7.10.0-darwin-x86_64/demo.log"
        },
        "offset" => 121
    },
          "line" => "The fourth Document",
    "@timestamp" => 2023-02-26T22:03:00.000Z,
         "input" => {
        "type" => "log"
    },
          "host" => {
        "name" => "2023"
    }
}
{
      "@version" => "1",
           "ecs" => {
        "version" => "1.6.0"
    },
         "agent" => {
                "name" => "2023",
                  "id" => "c171d8ac-3546-44d4-a156-73aef217e0c4",
                "type" => "filebeat",
             "version" => "7.10.0",
        "ephemeral_id" => "144bc0ef-4562-4d65-91de-6f58b40217b0",
            "hostname" => "2023"
    },
          "tags" => [
        [0] "beats_input_codec_plain_applied"
    ],
           "log" => {
          "file" => {
            "path" => "/Users/lihui/elk/filebeat-7.10.0-darwin-x86_64/demo.log"
        },
        "offset" => 284
    },
          "line" => "The eighth Document",
    "@timestamp" => 2023-02-26T22:07:00.000Z,
          "host" => {
        "name" => "2023"
    },
         "input" => {
        "type" => "log"
    }
}
{
      "@version" => "1",
           "ecs" => {
        "version" => "1.6.0"
    },
         "agent" => {
                "name" => "2023",
                "type" => "filebeat",
                  "id" => "c171d8ac-3546-44d4-a156-73aef217e0c4",
             "version" => "7.10.0",
        "ephemeral_id" => "144bc0ef-4562-4d65-91de-6f58b40217b0",
            "hostname" => "2023"
    },
          "tags" => [
        [0] "beats_input_codec_plain_applied"
    ],
           "log" => {
          "file" => {
            "path" => "/Users/lihui/elk/filebeat-7.10.0-darwin-x86_64/demo.log"
        },
        "offset" => 0
    },
          "line" => "The first Document",
    "@timestamp" => 2023-02-26T22:00:00.000Z,
          "host" => {
        "name" => "2023"
    },
         "input" => {
        "type" => "log"
    }
}
{
      "@version" => "1",
           "ecs" => {
        "version" => "1.6.0"
    },
         "agent" => {
                "name" => "2023",
                  "id" => "c171d8ac-3546-44d4-a156-73aef217e0c4",
                "type" => "filebeat",
             "version" => "7.10.0",
        "ephemeral_id" => "144bc0ef-4562-4d65-91de-6f58b40217b0",
            "hostname" => "2023"
    },
          "tags" => [
        [0] "beats_input_codec_plain_applied"
    ],
           "log" => {
          "file" => {
            "path" => "/Users/lihui/elk/filebeat-7.10.0-darwin-x86_64/demo.log"
        },
        "offset" => 325
    },
          "line" => "The nighth Document",
    "@timestamp" => 2023-02-26T22:08:00.000Z,
         "input" => {
        "type" => "log"
    },
          "host" => {
        "name" => "2023"
    }
}
{
      "@version" => "1",
           "ecs" => {
        "version" => "1.6.0"
    },
         "agent" => {
                "name" => "2023",
                  "id" => "c171d8ac-3546-44d4-a156-73aef217e0c4",
                "type" => "filebeat",
             "version" => "7.10.0",
        "ephemeral_id" => "144bc0ef-4562-4d65-91de-6f58b40217b0",
            "hostname" => "2023"
    },
          "tags" => [
        [0] "beats_input_codec_plain_applied"
    ],
           "log" => {
          "file" => {
            "path" => "/Users/lihui/elk/filebeat-7.10.0-darwin-x86_64/demo.log"
        },
        "offset" => 242
    },
          "line" => "The seventh Document",
    "@timestamp" => 2023-02-26T22:06:00.000Z,
          "host" => {
        "name" => "2023"
    },
         "input" => {
        "type" => "log"
    }
}
{
      "@version" => "1",
           "ecs" => {
        "version" => "1.6.0"
    },
         "agent" => {
                "name" => "2023",
                  "id" => "c171d8ac-3546-44d4-a156-73aef217e0c4",
                "type" => "filebeat",
             "version" => "7.10.0",
        "ephemeral_id" => "144bc0ef-4562-4d65-91de-6f58b40217b0",
            "hostname" => "2023"
    },
          "tags" => [
        [0] "beats_input_codec_plain_applied"
    ],
           "log" => {
          "file" => {
            "path" => "/Users/lihui/elk/filebeat-7.10.0-darwin-x86_64/demo.log"
        },
        "offset" => 162
    },
          "line" => "The fifth Document",
    "@timestamp" => 2023-02-26T22:04:00.000Z,
         "input" => {
        "type" => "log"
    },
          "host" => {
        "name" => "2023"
    }
}
可以看到这些数据都已经进行了格式化,过滤,应该就是传给es存储的格式了
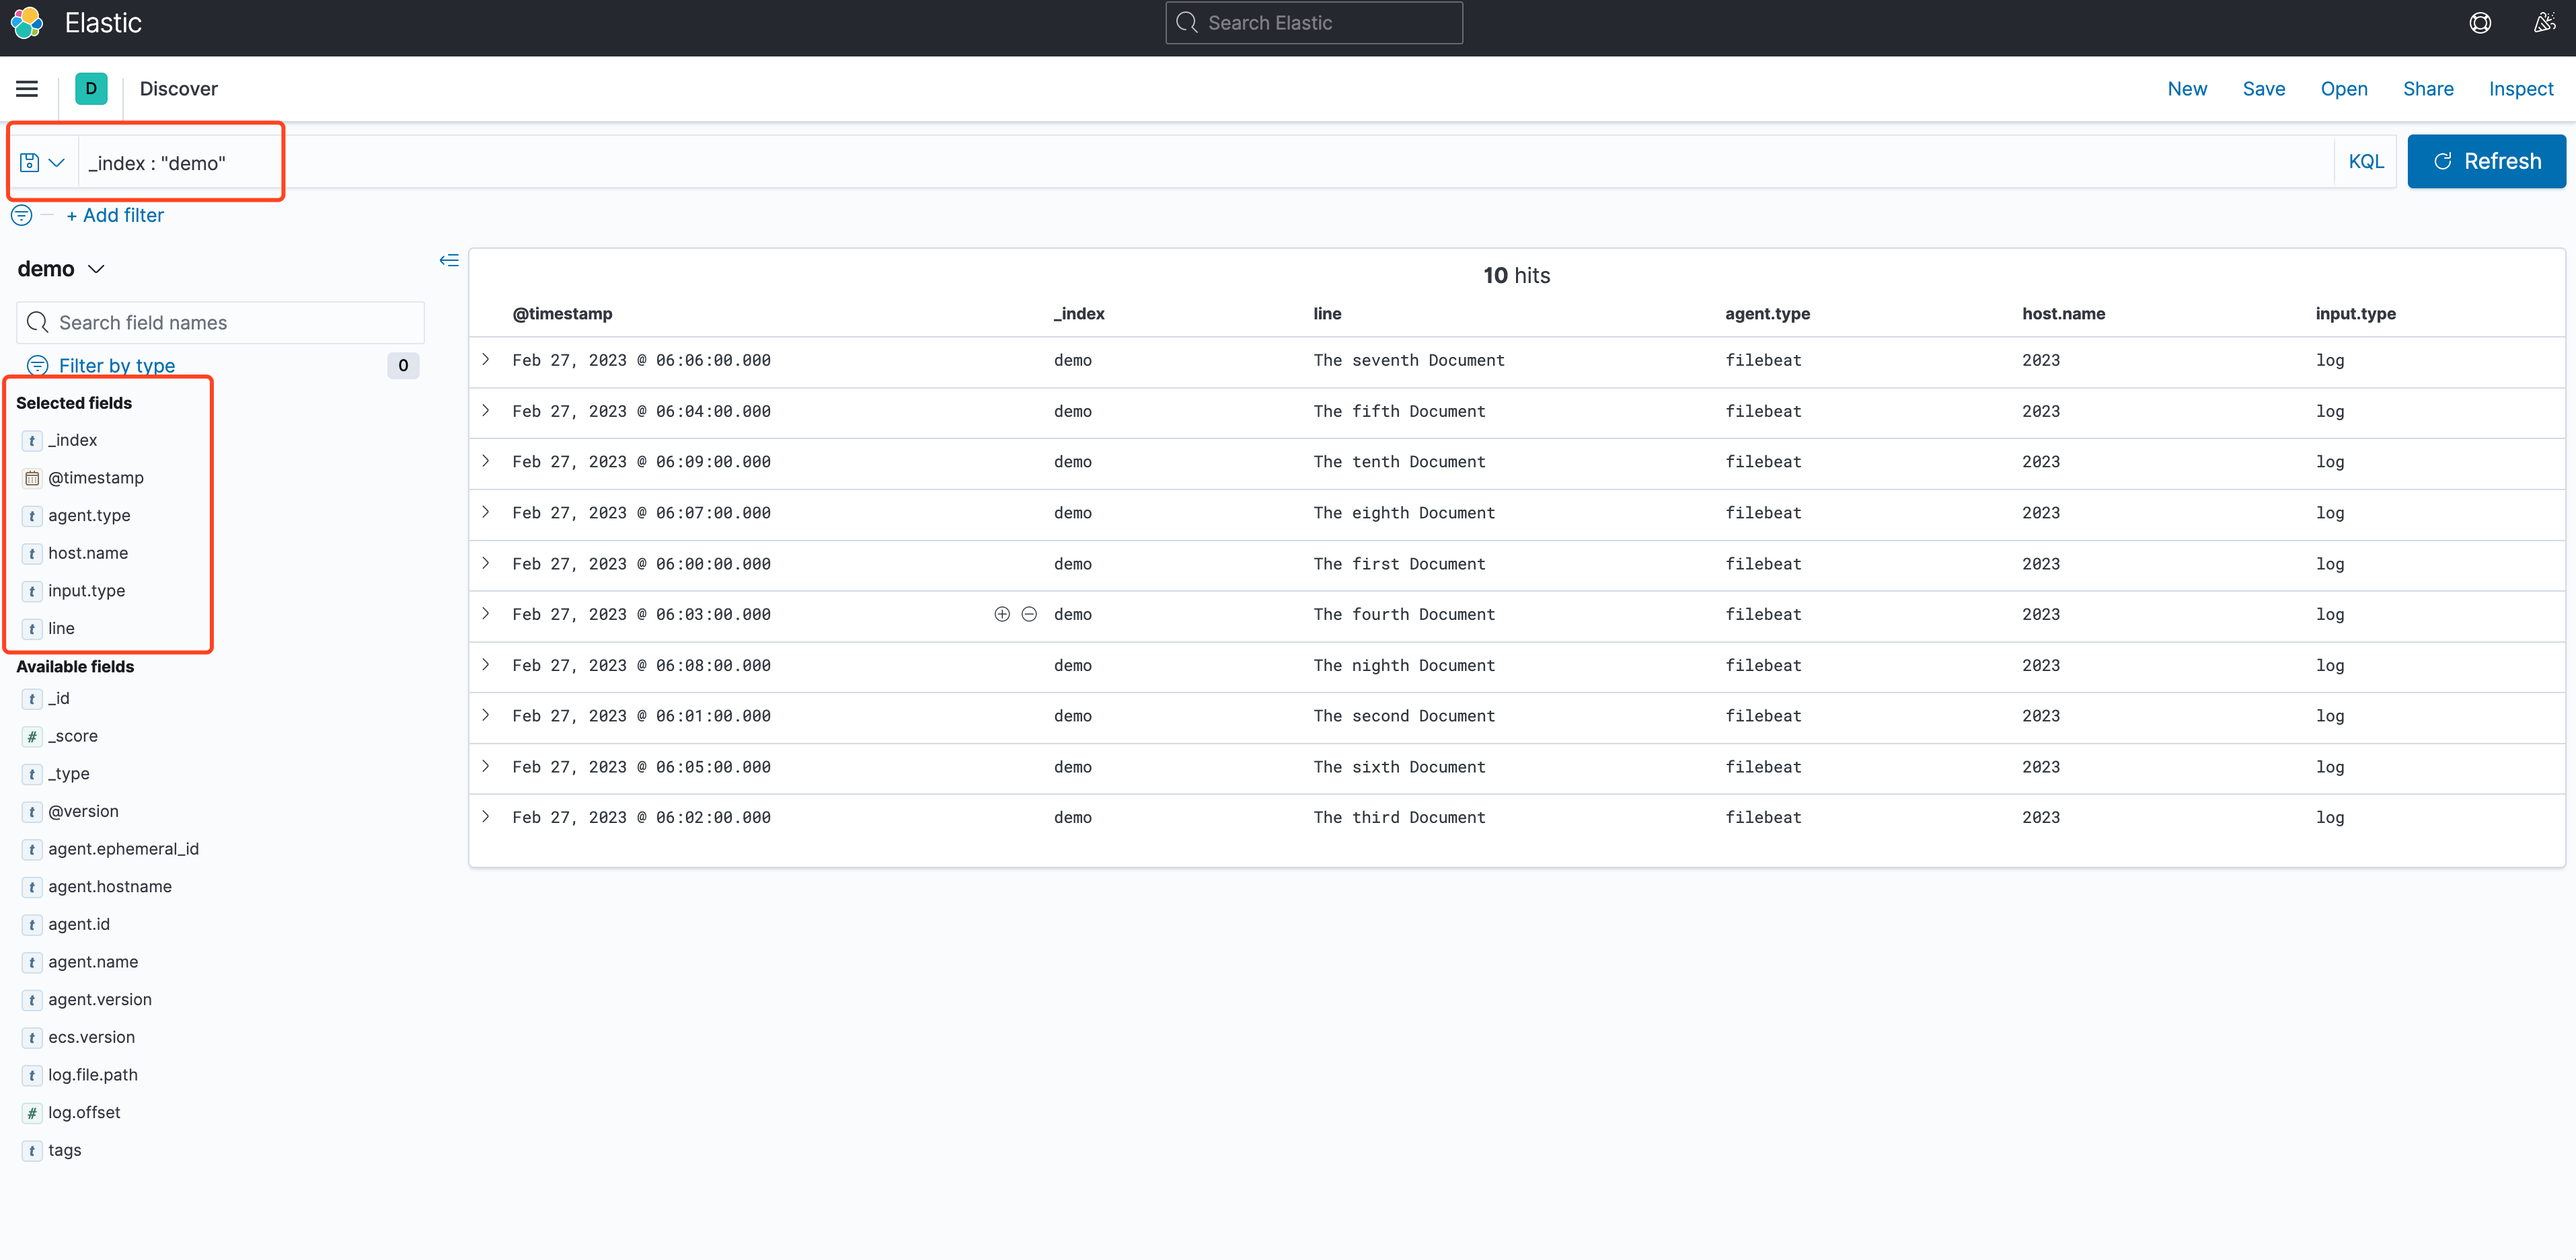
最终,我们通过kibana来查看数据
完美收工,OVER
