新创建一个租户,始终记住,租户不能干什么,它抽象的仅仅是一些资源的集合
~$ keystone tenant-create --name tenant_lihui
+-------------+----------------------------------+
|   Property  |              Value               |
+-------------+----------------------------------+
| description |                                  |
|   enabled   |               True               |
|      id     | 7686fe201cd840849270883c0785dda8 |
|     name    |           tenant_lihui           |
+-------------+----------------------------------+
查看该租户的网络信息,可以看到此时租户并没有任何网络资源
neutron net-list --tenant-id 7686fe201cd840849270883c0785dda8
^
创建网络,这里创建私有网络注意要指定一下network_type为vxlan,否则默认创建的会是local的
~$ neutron net-create private_7686fe201cd840849270883c0785dda8 --tenant-id 7686fe201cd840849270883c0785dda8 --provider:network_type vxlan
Created a new network:
+-----------------------+------------------------------------------------------------------------------------------------------------------------------------------------------------------------------+
| Field                 | Value                                                                                                                                                                        |
+-----------------------+------------------------------------------------------------------------------------------------------------------------------------------------------------------------------+
| admin_state_up        | True                                                                                                                                                                         |
| id                    | 84fb2c09-ddb6-40f4-93ba-4d2f1f37de71                                                                                                                                         |
| mtu                   | 1400                                                                                                                                                                         |
| name                  | private_7686fe201cd840849270883c0785dda8                                                                                                                                     |
| port_security_enabled | False                                                                                                                                                                        |
| provider:network_type | vxlan                                                                                                                                                                        |
| segments              | {"network_id": "84fb2c09-ddb6-40f4-93ba-4d2f1f37de71", "provider:segmentation_id": 8016, "id": "b9f5738a-0da7-41e0-97dc-a569b41c3eab", "network_type": "vxlan", "mtu": 1400} |
| shared                | False                                                                                                                                                                        |
| status                | ACTIVE                                                                                                                                                                       |
| subnets               |                                                                                                                                                                              |
| tenant_id             | 7686fe201cd840849270883c0785dda8                                                                                                                                             |
+-----------------------+------------------------------------------------------------------------------------------------------------------------------------------------------------------------------+
这样就可以查看租户network信息,发现多了一条网络资源信息,隔离的L2广播域
~$ neutron net-list --tenant-id 7686fe201cd840849270883c0785dda8
+--------------------------------------+------------------------------------------+---------+
| id                                   | name                                     | subnets |
+--------------------------------------+------------------------------------------+---------+
| 84fb2c09-ddb6-40f4-93ba-4d2f1f37de71 | private_7686fe201cd840849270883c0785dda8 |         |
+--------------------------------------+------------------------------------------+---------+
创建subnet
~$ neutron subnet-create 84fb2c09-ddb6-40f4-93ba-4d2f1f37de71 10.177.64.0/23 --tenant-id 7686fe201cd840849270883c0785dda8 --name private_7686fe201cd840849270883c0785dda8
Created a new subnet:
+------------------+--------------------------------------------------+
| Field            | Value                                            |
+------------------+--------------------------------------------------+
| allocation_pools | {"start": "10.177.64.2", "end": "10.177.65.254"} |
| cidr             | 10.177.64.0/23                                   |
| dns_nameservers  |                                                  |
| enable_dhcp      | True                                             |
| enable_dns       | True                                             |
| gateway_ip       | 10.177.64.1                                      |
| host_routes      |                                                  |
| id               | 2c1c2971-c8ca-4e45-b808-ec40e660d890             |
| ip_version       | 4                                                |
| name             | private_7686fe201cd840849270883c0785dda8         |
| network_id       | 84fb2c09-ddb6-40f4-93ba-4d2f1f37de71             |
| tenant_id        | 7686fe201cd840849270883c0785dda8                 |
+------------------+--------------------------------------------------+
这样就有了和network相关联的subnet,隔离的L3域
~$ neutron net-list --tenant-id 7686fe201cd840849270883c0785dda8
+--------------------------------------+------------------------------------------+-----------------------------------------------------+
| id                                   | name                                     | subnets                                             |
+--------------------------------------+------------------------------------------+-----------------------------------------------------+
| 84fb2c09-ddb6-40f4-93ba-4d2f1f37de71 | private_7686fe201cd840849270883c0785dda8 | 2c1c2971-c8ca-4e45-b808-ec40e660d890 10.177.64.0/23 |
+--------------------------------------+------------------------------------------+-----------------------------------------------------+
一个network可以有多个subnet,每个subnet必须有一个CIDR来和一个network关联,从CIDR里可以分配IP地址,更确切的是这里的allocation_pools池子里,因为这里是用户自定义指定,不一定有CIDR那么多,比如可以限制你只用部分子集,这里dhcp和dns都是enable的,指定了一个网关gateway,但这里的subnet只有IP池,网关,没有路由信息,那么假如是创建虚拟机,里面也没路由信息,因此需要将相关路由信息也推送一下,host_routers字段
~$ neutron subnet-show 2c1c2971-c8ca-4e45-b808-ec40e660d890
+------------------+--------------------------------------------------+
| Field            | Value                                            |
+------------------+--------------------------------------------------+
| allocation_pools | {"start": "10.177.64.2", "end": "10.177.65.254"} |
| cidr             | 10.177.64.0/23                                   |
| dns_nameservers  |                                                  |
| enable_dhcp      | True                                             |
| enable_dns       | True                                             |
| gateway_ip       | 10.177.64.1                                      |
| host_routes      |                                                  |
| id               | 2c1c2971-c8ca-4e45-b808-ec40e660d890             |
| ip_version       | 4                                                |
| name             | private_7686fe201cd840849270883c0785dda8         |
| network_id       | 84fb2c09-ddb6-40f4-93ba-4d2f1f37de71             |
| tenant_id        | 7686fe201cd840849270883c0785dda8                 |
+------------------+--------------------------------------------------+
其实可以在创建subnet的时候推送路由,也可以创建后进行update,我喜欢后者
~$ neutron subnet-update --host-route destination=10.177.66.0/23,nexthop=10.177.64.1,order=10 --host-route destination=10.177.8.0/22,nexthop=10.177.64.1,order=10 --host-route destination=169.254.169.254/32,nexthop=10.177.64.1,order=10 2c1c2971-c8ca-4e45-b808-ec40e660d890
Updated subnet: 2c1c2971-c8ca-4e45-b808-ec40e660d890
~$ neutron subnet-show 2c1c2971-c8ca-4e45-b808-ec40e660d890
+------------------+------------------------------------------------------------------------------+
| Field            | Value                                                                        |
+------------------+------------------------------------------------------------------------------+
| allocation_pools | {"start": "10.177.64.2", "end": "10.177.65.254"}                             |
| cidr             | 10.177.64.0/23                                                               |
| dns_nameservers  |                                                                              |
| enable_dhcp      | True                                                                         |
| enable_dns       | True                                                                         |
| gateway_ip       | 10.177.64.1                                                                  |
| host_routes      | {"destination": "10.177.66.0/23", "nexthop": "10.177.64.1", "order": 10}     |
|                  | {"destination": "10.177.8.0/22", "nexthop": "10.177.64.1", "order": 10}      |
|                  | {"destination": "169.254.169.254/32", "nexthop": "10.177.64.1", "order": 10} |
| id               | 2c1c2971-c8ca-4e45-b808-ec40e660d890                                         |
| ip_version       | 4                                                                            |
| name             | private_7686fe201cd840849270883c0785dda8                                     |
| network_id       | 84fb2c09-ddb6-40f4-93ba-4d2f1f37de71                                         |
| tenant_id        | 7686fe201cd840849270883c0785dda8                                             |
+------------------+------------------------------------------------------------------------------+
创建router
~$ neutron router-create router_private_7686fe201cd840849270883c0785dda8 --enable-ha --ha-type keepalived --tenant-id 7686fe201cd840849270883c0785dda8
Created a new router:
+-----------------------+-------------------------------------------------+
| Field                 | Value                                           |
+-----------------------+-------------------------------------------------+
| admin_state_up        | True                                            |
| external_gateway_info |                                                 |
| ha_type               | keepalived                                      |
| id                    | 62e46afd-7b1d-4f43-9921-ee2fc478b282            |
| inter_max_rate        |                                                 |
| intra_max_rate        |                                                 |
| is_ha                 | True                                            |
| name                  | router_private_7686fe201cd840849270883c0785dda8 |
| status                | ACTIVE                                          |
| tenant_id             | 7686fe201cd840849270883c0785dda8                |
+-----------------------+-------------------------------------------------+
此时router创建出来,没起到啥作用,没有qrouter namespace,因此需要将它与网络关联起来,使得真正起到路由的作用,官方话语是:Add an internal network interface to a router
~$ neutron router-interface-add 62e46afd-7b1d-4f43-9921-ee2fc478b282 2c1c2971-c8ca-4e45-b808-ec40e660d890
Added interface 46965802-c092-480b-ad98-0b6d12e9c0e1 to router 62e46afd-7b1d-4f43-9921-ee2fc478b282.
查看一下L3,默认Keepalive会绑上两个
~$ neutron l3-agent-list-hosting-router 62e46afd-7b1d-4f43-9921-ee2fc478b282
+--------------------------------------+--------------+----------------+-------+
| id                                   | host         | admin_state_up | alive |
+--------------------------------------+--------------+----------------+-------+
| 2893ed3d-ed2d-4991-9693-62f2edc23722 | 10-177-0-228 | True           | :-)   |
| a7b4d01a-780c-4056-a3fb-b2549c8745e3 | 10-177-0-34  | True           | :-)   |
+--------------------------------------+--------------+----------------+-------+
此时L3节点上肯定就有namespace了,L3 Agent这部分就不细写了,详细的可以看这个:
http://lihuia.com/2016/11/13/%E8%99%9A%E6%8B%9F%E6%9C%BA%E9%80%9A%E8%BF%87l3agent%E8%AE%BF%E9%97%AE%E5%A4%96%E7%BD%91%E7%9A%84%E6%B5%81%E7%A8%8B%E6%B5%8B%E8%AF%95/
但是和L3 Agent不同的是,DHCP Agent(如果有)却并没有绑
~$ neutron dhcp-agent-list-hosting-net 84fb2c09-ddb6-40f4-93ba-4d2f1f37de71
^
此时是没有dhcp的namespace的
这里可以直接创建第一个该网络带IP地址的PORT来触发DHCP Agent的binding
~$ neutron port-create 84fb2c09-ddb6-40f4-93ba-4d2f1f37de71
Created a new port:
+-----------------------+------------------------------------------------------------------------------------+
| Field                 | Value                                                                              |
+-----------------------+------------------------------------------------------------------------------------+
| admin_state_up        | True                                                                               |
| allowed_address_pairs |                                                                                    |
| binding:capabilities  | {"port_filter": false}                                                             |
| binding:host_id       |                                                                                    |
| binding:profile       | {}                                                                                 |
| binding:vif_type      | unbound                                                                            |
| device_id             |                                                                                    |
| device_owner          |                                                                                    |
| extra_data            | {"user_id": "9dbc0af6e89f4736a72e10b25f67470c"}                                    |
| fixed_ips             | {"subnet_id": "2c1c2971-c8ca-4e45-b808-ec40e660d890", "ip_address": "10.177.64.4"} |
| id                    | a560adff-25d7-4359-b082-d0b4faae70b6                                               |
| mac_address           | fa:16:3e:3b:b6:84                                                                  |
| name                  |                                                                                    |
| network_id            | 84fb2c09-ddb6-40f4-93ba-4d2f1f37de71                                               |
| security_groups       |                                                                                    |
| status                | DOWN                                                                               |
| support_azs           |                                                                                    |
| tenant_id             | a33d46db489949939537c94eeb089ae6                                                   |
+-----------------------+------------------------------------------------------------------------------------+
再次查看,DHCP Agent绑上了,不要奇怪user_id和tenant_id和上面对不上,原因是此处我是用admin来操作的,只是想用tenant_lihui的network创建第一个port来触发DHCP绑定
~$ neutron dhcp-agent-list-hosting-net 84fb2c09-ddb6-40f4-93ba-4d2f1f37de71
+--------------------------------------+-------------+----------------+-------+
| id                                   | host        | admin_state_up | alive |
+--------------------------------------+-------------+----------------+-------+
| 26466daf-2c66-495b-8ea0-dd27082898bb | 10-177-0-33 | True           | :-)   |
+--------------------------------------+-------------+----------------+-------+
查看DHCP节点的namespace
~$ sudo ip netns exec qdhcp-84fb2c09-ddb6-40f4-93ba-4d2f1f37de71 ip a
1: lo:  mtu 65536 qdisc noqueue state UNKNOWN group default
    link/loopback 00:00:00:00:00:00 brd 00:00:00:00:00:00
    inet 127.0.0.1/8 scope host lo
       valid_lft forever preferred_lft forever
    inet6 ::1/128 scope host
       valid_lft forever preferred_lft forever
11837: tapbee89505-58:  mtu 1500 qdisc pfifo_fast state UNKNOWN group default qlen 1000
    link/ether fa:16:3e:0d:3b:ff brd ff:ff:ff:ff:ff:ff
    inet 10.177.64.9/23 brd 10.177.65.255 scope global tapbee89505-58
       valid_lft forever preferred_lft forever
    inet6 fe80::f816:3eff:fe0d:3bff/64 scope link
       valid_lft forever preferred_lft forever
这样,网络,子网,router,L3,DHCP(DHCP其实可以不弄)全部搞定,租户的私有网络就初始化完成了
创建一个用户,关联该租户
~$ keystone user-create --name user_lihui --tenant 7686fe201cd840849270883c0785dda8 --pass lihui --email lihui@maoxiaomeng.com
+----------+----------------------------------+
| Property |              Value               |
+----------+----------------------------------+
|  email   |      lihui@maoxiaomeng.com       |
| enabled  |               True               |
|    id    | 8bdfe337a81f4bef8ff48d53f123bff4 |
|   name   |            user_lihui            |
| tenantId | 7686fe201cd840849270883c0785dda8 |
| username |            user_lihui            |
+----------+----------------------------------+
获取一个token
~$ curl -s -X POST http://10.177.3.24:5000/v2.0/tokens -H "Content-Type: application/json" -d '{"auth": {"tenantName": "tenant_lihui", "passwordCredentials": {"username": "user_lihui", "password": "lihui"}}}' | jq .access.token
{
  "issued_at": "2017-01-18T15:28:55.000000Z",
  "expires": "2017-01-19T15:28:55Z",
  "id": "c5e8b733f5cf416bb848a01702dd37b9",
  "tenant": {
    "description": null,
    "enabled": true,
    "id": "7686fe201cd840849270883c0785dda8",
    "name": "tenant_lihui"
  },
  "audit_ids": [
    "eSzfHhS_Sl66KuN28LZfag"
  ]
}
创建一台虚拟机,这里传入最简单的必备参数,其实如果上面不创建PORT,这里创建之后,也会绑上DHCP Agent
~$ curl -s 'http://10.177.3.24:8774/v2/7686fe201cd840849270883c0785dda8/servers' -X POST -H "Content-Type: application/json" -H "Accept: application/json" -H "X-Auth-Token: c5e8b733f5cf416bb848a01702dd37b9" -d '{"server": {"name": "lihui-vm", "imageRef": "009b381e-f42e-42d5-a227-8fc032e6b5c8", "flavorRef": "1", "max_count": 1, "min_count": 1, "networks": [{"uuid": "84fb2c09-ddb6-40f4-93ba-4d2f1f37de71"}], "vncPass": "000000"}}' | jq .
{
  "server": {
    "links": [
      {
        "href": "http://10.177.3.24:8774/v2/7686fe201cd840849270883c0785dda8/servers/439ee68e-313b-4b8e-bd07-9f8bf470be41",
        "rel": "self"
      },
      {
        "href": "http://10.177.3.24:8774/7686fe201cd840849270883c0785dda8/servers/439ee68e-313b-4b8e-bd07-9f8bf470be41",
        "rel": "bookmark"
      }
    ],
    "adminPass": "H3r5kJYTKm34",
    "OS-DCF:diskConfig": "MANUAL",
    "id": "439ee68e-313b-4b8e-bd07-9f8bf470be41",
    "security_groups": [
      {
        "name": "default"
      }
    ],
    "vncPass": "000000"
  }
}
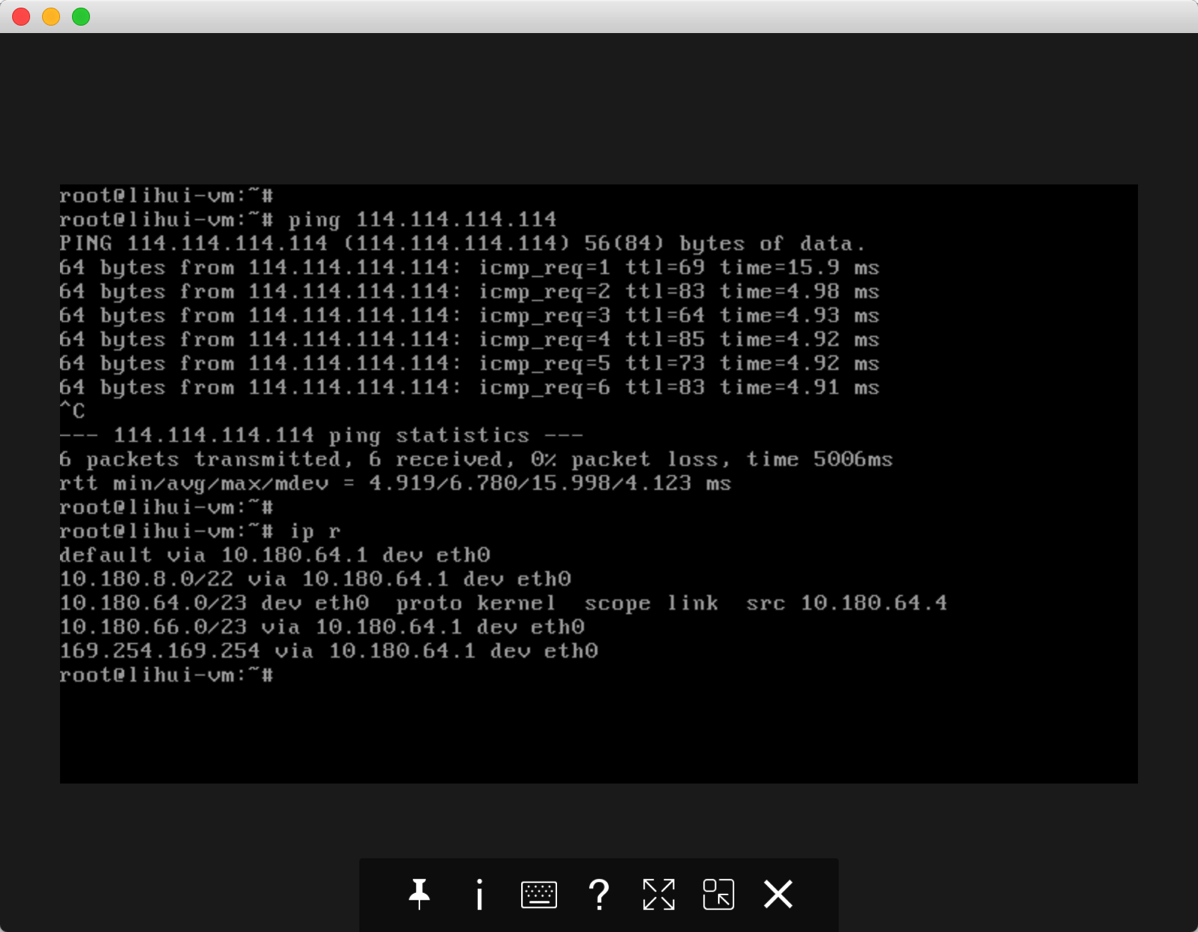
由于这里还没有创建VPN服务,无法SSH,这里直接通过VNC客户端连进去,测试一下网络以及对比subnet里配置的路由信息

