对于后端
首先建库建表
CREATE TABLE `user` (
`id` BIGINT(20) NOT NULL AUTO_INCREMENT,
`name` VARCHAR(20),
`email` VARCHAR(30),
`phone` VARCHAR(30),
`job` VARCHAR(30),
`age` BIGINT(20),
PRIMARY KEY(`id`)
) ENGINE=InnoDB AUTO_INCREMENT=1 DEFAULT CHARSET=utf8;
查一下user表
mysql> desc user;
+-------+-------------+------+-----+---------+----------------+
| Field | Type        | Null | Key | Default | Extra          |
+-------+-------------+------+-----+---------+----------------+
| id    | bigint(20)  | NO   | PRI | NULL    | auto_increment |
| name  | varchar(20) | YES  |     | NULL    |                |
| email | varchar(30) | YES  |     | NULL    |                |
| phone | varchar(30) | YES  |     | NULL    |                |
| job   | varchar(30) | YES  |     | NULL    |                |
| age   | bigint(20)  | YES  |     | NULL    |                |
+-------+-------------+------+-----+---------+----------------+
手动插三条数据
mysql> INSERT INTO `test`.`user`
    -> (`id`, `name`, `email`, `phone`, `job`, `age`)
    -> VALUES
    -> (1, 'lihui', 'me@lihuia.com', '17777777777', 'IT', 25),
    -> (2, 'lilei', 'me@lileia.com', '16666666666', 'IT', 24),
    -> (3, 'liwei', 'me@liweia.com', '15555555555', 'IT', 23);
Query OK, 3 rows affected (0.04 sec)
Records: 3  Duplicates: 0  Warnings: 0
详情如下
mysql> SELECT * FROM `test`.`user`;
+----+-------+---------------+-------------+------+------+
| id | name  | email         | phone       | job  | age  |
+----+-------+---------------+-------------+------+------+
|  1 | lihui | me@lihuia.com | 17777777777 | IT   |   25 |
|  2 | lilei | me@lileia.com | 16666666666 | IT   |   24 |
|  3 | liwei | me@liweia.com | 15555555555 | IT   |   23 |
+----+-------+---------------+-------------+------+------+
3 rows in set (0.00 sec)
接下来就是SpringBoot工程,创建好工程后,我这里添加的依赖如下,lombok主要是用一些注解
<dependencies>
    <dependency>
        <groupId>org.springframework.boot</groupId>
        <artifactId>spring-boot-starter-data-jpa</artifactId>
    </dependency>
    <dependency>
        <groupId>org.springframework.boot</groupId>
        <artifactId>spring-boot-starter-web</artifactId>
    </dependency>

    <dependency>
        <groupId>mysql</groupId>
        <artifactId>mysql-connector-java</artifactId>
        <scope>runtime</scope>
    </dependency>
    <dependency>
        <groupId>org.springframework.boot</groupId>
        <artifactId>spring-boot-starter-test</artifactId>
        <scope>test</scope>
    </dependency>
    <dependency>
        <groupId>org.projectlombok</groupId>
        <artifactId>lombok</artifactId>
        <version>1.18.8</version>
    </dependency>
</dependencies>
创建一个User类,对应表里的字段
package com.lihuia.webserver.user;

import javax.persistence.Entity;
import javax.persistence.GeneratedValue;
import javax.persistence.GenerationType;
import javax.persistence.Id;

import lombok.Data;

/**
 * Copyright (C), 2018-2019
 * FileName: User
 * Author:   lihui
 * Date:     2019-09-13
 */

@Data
@Entity
public class User {
    @Id
    @GeneratedValue(strategy = GenerationType.IDENTITY)
    private Integer id;
    private String name;
    private String age;
    private String phone;
    private String email;
    private String job;

    public User(){
    }
}
定义一个UserRepository接口,继承Jpa,能够使用数据库的操作
package com.lihuia.webserver.user;

import org.springframework.data.jpa.repository.JpaRepository;

/**
 * Copyright (C), 2018-2019
 * FileName: UserRepository
 * Author:   lihui
 * Date:     2019-09-13
 */

public interface UserRepository extends JpaRepository<User,Integer> {
}
接着是Controller类,增删改查
package com.lihuia.webserver.user;

import java.util.List;

import org.springframework.web.bind.annotation.DeleteMapping;
import org.springframework.web.bind.annotation.GetMapping;
import org.springframework.web.bind.annotation.PathVariable;
import org.springframework.web.bind.annotation.PostMapping;
import org.springframework.web.bind.annotation.RequestBody;
import org.springframework.web.bind.annotation.RequestMapping;
import org.springframework.web.bind.annotation.RestController;

/**
 * Copyright (C), 2018-2019
 * FileName: UserController
 * Author:   lihui
 * Date:     2019-09-13
 */

@RestController
@RequestMapping("/api/users")
public class UserController {
    private UserRepository userRepository;
    public UserController(UserRepository userRepository) {
        this.userRepository = userRepository;
    }

    @GetMapping
    public List<User> getList() {
        return userRepository.findAll();
    }

    @PostMapping
    public User addUser(@RequestBody User user) {
        return userRepository.save(user);
    }

    @DeleteMapping(value = "/{id}")
    public void delUser(@PathVariable("id") Integer id) {
        userRepository.deleteById(id);
    }
}
后端基本就这些了,加上数据库属性配置
spring.datasource.driver-class-name=com.mysql.cj.jdbc.Driver
spring.datasource.url=jdbc:mysql://localhost:3306/test?useSSL=false&serverTimezone=UTC&characterEncoding=utf8&allowMultiQueries=true
spring.datasource.username=root
spring.datasource.password=lihui

spring.jpa.show-sql=true
这时候SpringBoot工程应该就可以启动了,启动下面Main
package com.lihuia.webserver;

import org.springframework.boot.SpringApplication;
import org.springframework.boot.autoconfigure.SpringBootApplication;

@SpringBootApplication
public class WebServerApplication {

    public static void main(String[] args) {
        SpringApplication.run(WebServerApplication.class, args);
    }

}
下面是前端,基于React工程,我这里依旧是在IDEA上创建的,创建,Static Web,React App即可
首先src下新建一个UserList.js文件
import React, {Component} from 'react';
import 'isomorphic-fetch';
import {Button} from 'react-bootstrap';

export default class UserList extends Component {
   constructor() {
      super();
      this.state = {}
   }
   async componentDidMount() {
      let users = await (await fetch(`/api/users`)).json();//主要是从后台拿json数据
      this.setState({users});
   }
   render() {
      let {users = []} = this.state;

      return (
         <div>
            <table className='table'>
               <thead>
               <tr>
                  <th>ID</th>
                  <th>姓名</th>
                  <th>年龄</th>
                  <th>电话</th>
                  <th>邮箱</th>
                  <th>职位</th>
                  <th>编辑</th>
               </tr>
               </thead>
               <tbody>
               {users.map(({id, name, age, phone, job, email}) =>
                  <tr key={id}>
                     <td>{id}</td>
                     <td>{name}</td>
                     <td>{age}</td>
                     <td>{phone}</td>
                     <td>{email}</td>
                     <td>{job}</td>
                     <td><Button onClick = {() => {
                        this.setState({users});
                     }}>配置</Button></td>
                  </tr>
               )}
               </tbody>
            </table>
         </div>
      );
   }
}
index.js里的配置如下
import React from 'react';
import ReactDOM from 'react-dom';
import './index.css';
import * as serviceWorker from './serviceWorker';
import {BrowserRouter, Route} from "react-router-dom";
import UserList from "./UserList";

ReactDOM.render((
      <BrowserRouter>
         <div className="container">
            <Route path="/"  exact component={UserList} />
         </div>
      </BrowserRouter>
   ),
   document.getElementById('root'));
// If you want your app to work offline and load faster, you can change
// unregister() to register() below. Note this comes with some pitfalls.
// Learn more about service workers: https://bit.ly/CRA-PWA
serviceWorker.unregister();
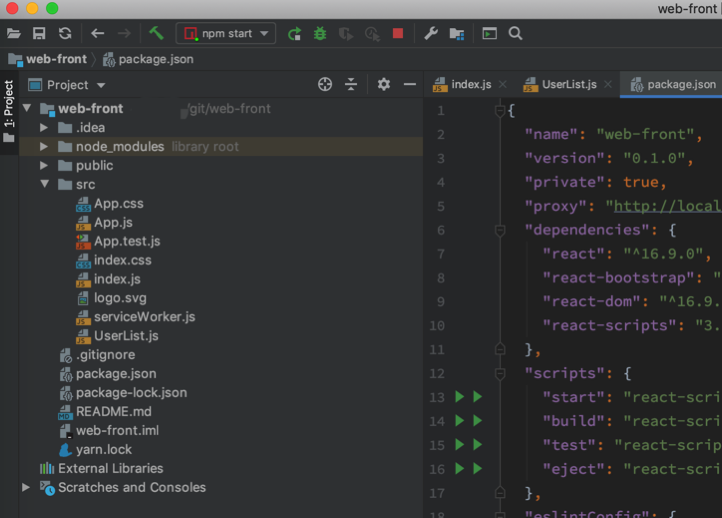
还有一点容易被遗忘,package.json里添加
"proxy": "http://localhost:8080",
因为react是端口3000启动,而springboot的启动端口是8080,所以做一个proxy,数据才能传递过来
完整文件目录如下,除了上面proxy加上之外,其它问题一般都是依赖缺失

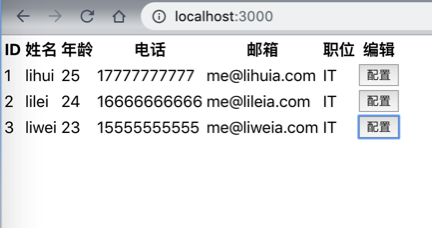
后端,前端都启动之后,打开域名

参考链接:
http://www.ruanyifeng.com/blog/2015/03/react.html
