正常情况下,不同环境下,一份code base,根据参数配置不同,来完成不同环境切换的适配
spring中提供了profile能够实现动态生成相应的bean,但是实际使用当中,通过maven的profile来区分不同的环境更为方便,它的profile是一组可供选择的环境配置,有默认选项,对于每个profile指定了唯一的id,那么假如在运行maven命令的时候,可以通过命令行参数来指定运行的profile,达到环境切换的目的
首先在pom.xml里
<profiles>
   <profile>
      <id>qa</id>
      <properties>
         <environment>qa</environment>
      </properties>
      <activation>
         <activeByDefault>true</activeByDefault>
      </activation>
   </profile>
   <profile>
      <id>dev</id>
      <properties>
         <environment>dev</environment>
      </properties>
   </profile>
</profiles>
这里的id标签就是maven在执行命令行参数时指定的-P的参数值,对应的environment就是不同的环境,而activeByDefault就是默认的profile,在哪个profile里设置为true,默认就是哪个profile
比如这里设置了测试qa环境和开发dev环境
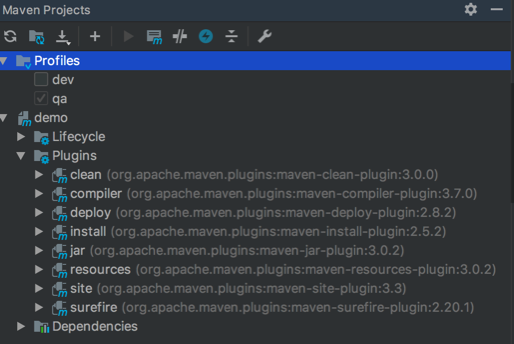
如果是用idea的话,maven就会显示出对应的profiles,而且可以看到默认是qa

下面通过一个具体的demo来说明
首先是Profile类
package com.lihuia.demo;

/**
 * Copyright (C), lihuia.com
 * FileName: Profile
 * Author:   lihui
 * Date:     2018/8/12
 */

public class Profile {

    private String environment;

    public Profile(String environment) {
        this.environment = environment;
    }

    public String getEnvironmentHost() {
        return environment + ".lihuia.com";
    }
}
有一个方法,返回的是当前环境的host
下面是测试类,来验证环境切换的正确性
package com.lihuia.demo;

import javax.annotation.Resource;

import org.testng.Assert;
import org.testng.annotations.Test;

import org.springframework.beans.factory.annotation.Value;
import org.springframework.test.context.ContextConfiguration;
import org.springframework.test.context.testng.AbstractTestNGSpringContextTests;

/**
 * Copyright (C), lihuia.com
 * FileName: ProfileTest
 * Author:   lihui
 * Date:     2018/8/12
 */

@ContextConfiguration(locations = {"classpath:dataSource/profile.xml",
            "classpath:testSource/test.xml"})
public class ProfileTest extends AbstractTestNGSpringContextTests {

    @Resource
    private Profile profile;

    @Value("${environment.host}")
    private String host;

    @Test
    public void testGetEnvironment() {
        Assert.assertEquals(profile.getEnvironmentHost(), host);
    }
}
同时bean的注入信息如下,构造方法参数传入的是qa
<?xml version="1.0" encoding="UTF-8"?>
<beans xmlns="http://www.springframework.org/schema/beans"
      xmlns:xsi="http://www.w3.org/2001/XMLSchema-instance"
      xsi:schemaLocation="http://www.springframework.org/schema/beans http://www.springframework.org/schema/beans/spring-beans.xsd">

   <bean id="profile" class="com.lihuia.demo.Profile">
      <constructor-arg name="environment" value="qa"></constructor-arg>
   </bean>
</beans>
那么profile.getEnvironmentHost()返回的就是qa.lihuia.com,而host的值来自@Value注解
${environment.host}的值来自test.properties
environment.host=${environment.host}
而最终它的值来自qa.properties
environment.host=qa.lihuia.com
和dev.properties
environment.host=dev.lihuia.com
其实这里也可以不需要通过test.properties中转,正常情况下,如果赋值的参数不是很多项目共用的,可以就放到自己的properties文件里
看到这里就比较直接了,需要激活profile,当profile为qa的时候,构造方法传入qa参数或者profile为dev的时候,构造方法传入dev参数,这个testcase能够正常通过
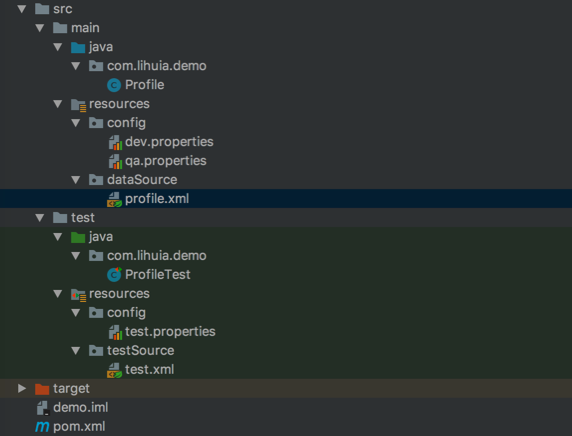
下面这个是项目结构

接着pom.xml里配置build节点
<build>
 <filters>
  <filter>src/main/resources/config/${environment}.properties</filter>
 </filters>
 <resources>
  <resource>
     <directory>src/main/resources</directory>
     <filtering>true</filtering>
  </resource>
 </resources>
 <testResources>
  <testResource>
     <directory>src/test/resources</directory>
     <filtering>true</filtering>
  </testResource>
 </testResources>
这里有两块地方
(1)resources,指定该目录下所有的xml以及properties文件需要按照profile环境切换来替换对应的值,这里main和test下面的resources都要指定,所有的xml和properties文件都有用到,同时test.xml的内容如下,它的任务是完成properties文件之间值的传递,@Value->test.properties->${environment}.properties,更具体起来说,是第一阶段
<?xml version="1.0" encoding="UTF-8"?>
<beans xmlns="http://www.springframework.org/schema/beans"
      xmlns:xsi="http://www.w3.org/2001/XMLSchema-instance"
      xsi:schemaLocation="http://www.springframework.org/schema/beans http://www.springframework.org/schema/beans/spring-beans.xsd">

   <bean id="dataSource"
        class="org.springframework.beans.factory.config.PropertyPlaceholderConfigurer">
      <property name="locations">
         <list>
            <value>classpath:config/test.properties</value>
         </list>
      </property>
   </bean>
</beans>
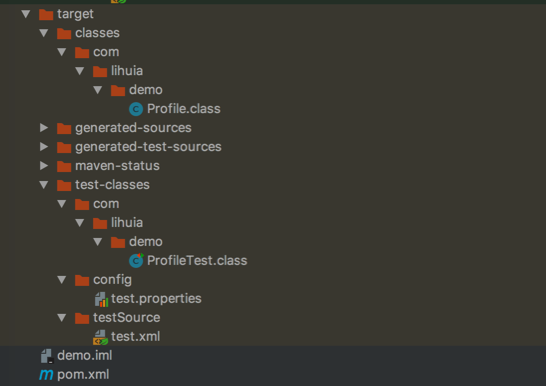
当build这个project之后,resource指定的directory都会copy到classes下面了

(2)filters,这里定义了不同profile下不同属性文件的目录地址,和profile里指定的id对应
到此为止,这个例子里所有的配置和属性文件就齐全了
要进行测试,只需要修改idea的maven上面图里勾选的profile来进行激活,或者修改pom.xml里默认激活的profile,来测试环境的切换
